Part 1 : Following along MIT intro to deep learning
Abhijit Ramesh / March 10, 2021
11 min read • ––– views
Intro to Deep Learning
Preface
In this blog series, I would be listening to the MIT intro to deep learning course and would be following along with the public live edition. This blog would contain my notes as well as some thoughts while following along with the course. The course is available in public and can be found here.
What is Deep Learning
Intelligence
This is the ability to process information so that it can be used to make a decision in the future.
Artificial Intelligence
A technique that uses computers to mimic human behaviour such that it can process information to be used in making a decision in the future.
Machine Leaning
Machine Learning gives the ability to teach machines to learn without being explicitly programmed.
Deep Learning
This is the process of extracting patters from data using neural networks and use these patters of features to perform making a decision in the future.
Why Deep Learning and Why Now ?
Why Deep Learning
Machine Learning
Machine Learning algorithms have some hand engineered features that they look for in the dataset.
Deep Learning
Deep Learning algorithms try to learn these features in a hierarchical manner from these data.
The issue with Machine Learning is that they might become brittle in practice when they are deployed to production
By hierarchal, the idea is that if we wanted to detect a face we start by detecting edges and couture in an image and then try to look at mid-level features such as eyes, ears nose etc... Then moving on to high-level features such as detecting the facial structure in the images.
These are the key ideas in deep learning and the hierarchy is core.
Why Now ?
Data
Data is the new oil, data is available in plenty all over the internet. Deep Learning algorithms are data hungry algorithms.
Hardware
When these deep learning algorithms have developed the hardware was not able to handle such huge amounts of data flow but now this has changed given the extremely parallelizable ability of these algorithms they are a very good fit to run on modern GPUs.
Software
Due to open source libraries such as Tensorflow and Pytorch deep learning has become very accessible.
The perceptron
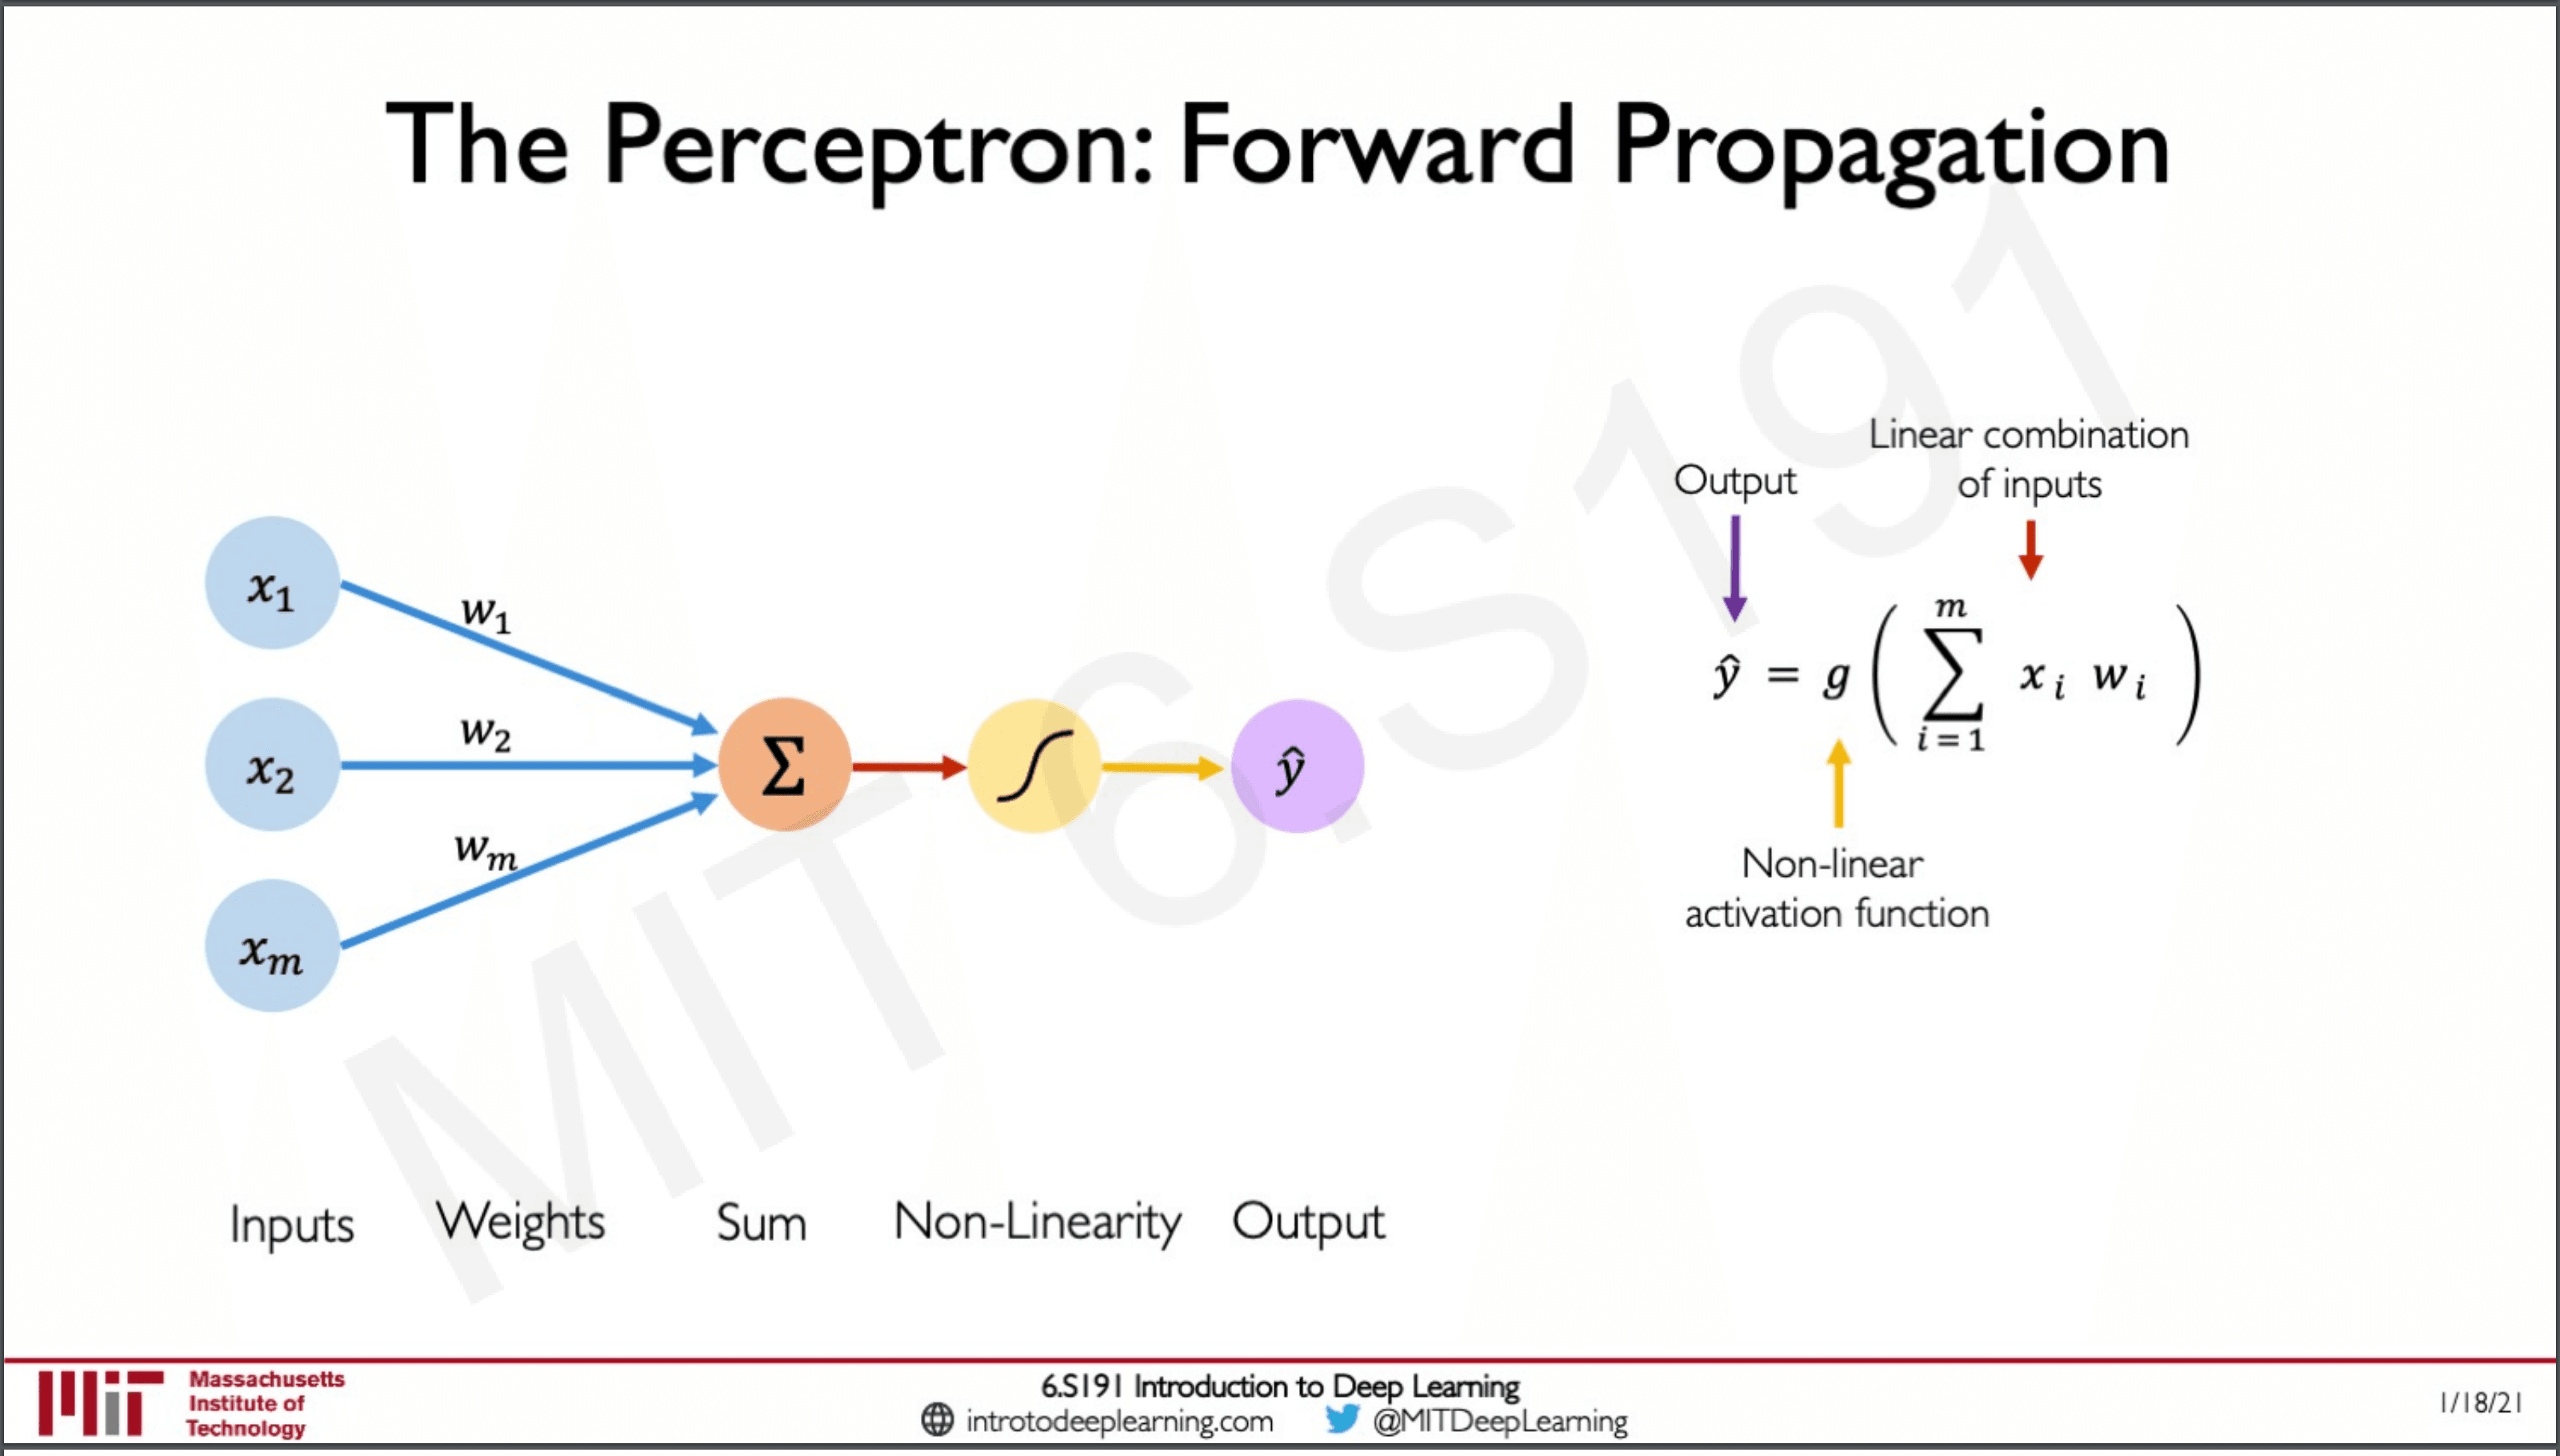 The perceptron is the building block of a neural network. It has inputs from to which are multiplied to its corresponding weights to which the results of which are summed together and passed through a non-linear activation function giving us the output .
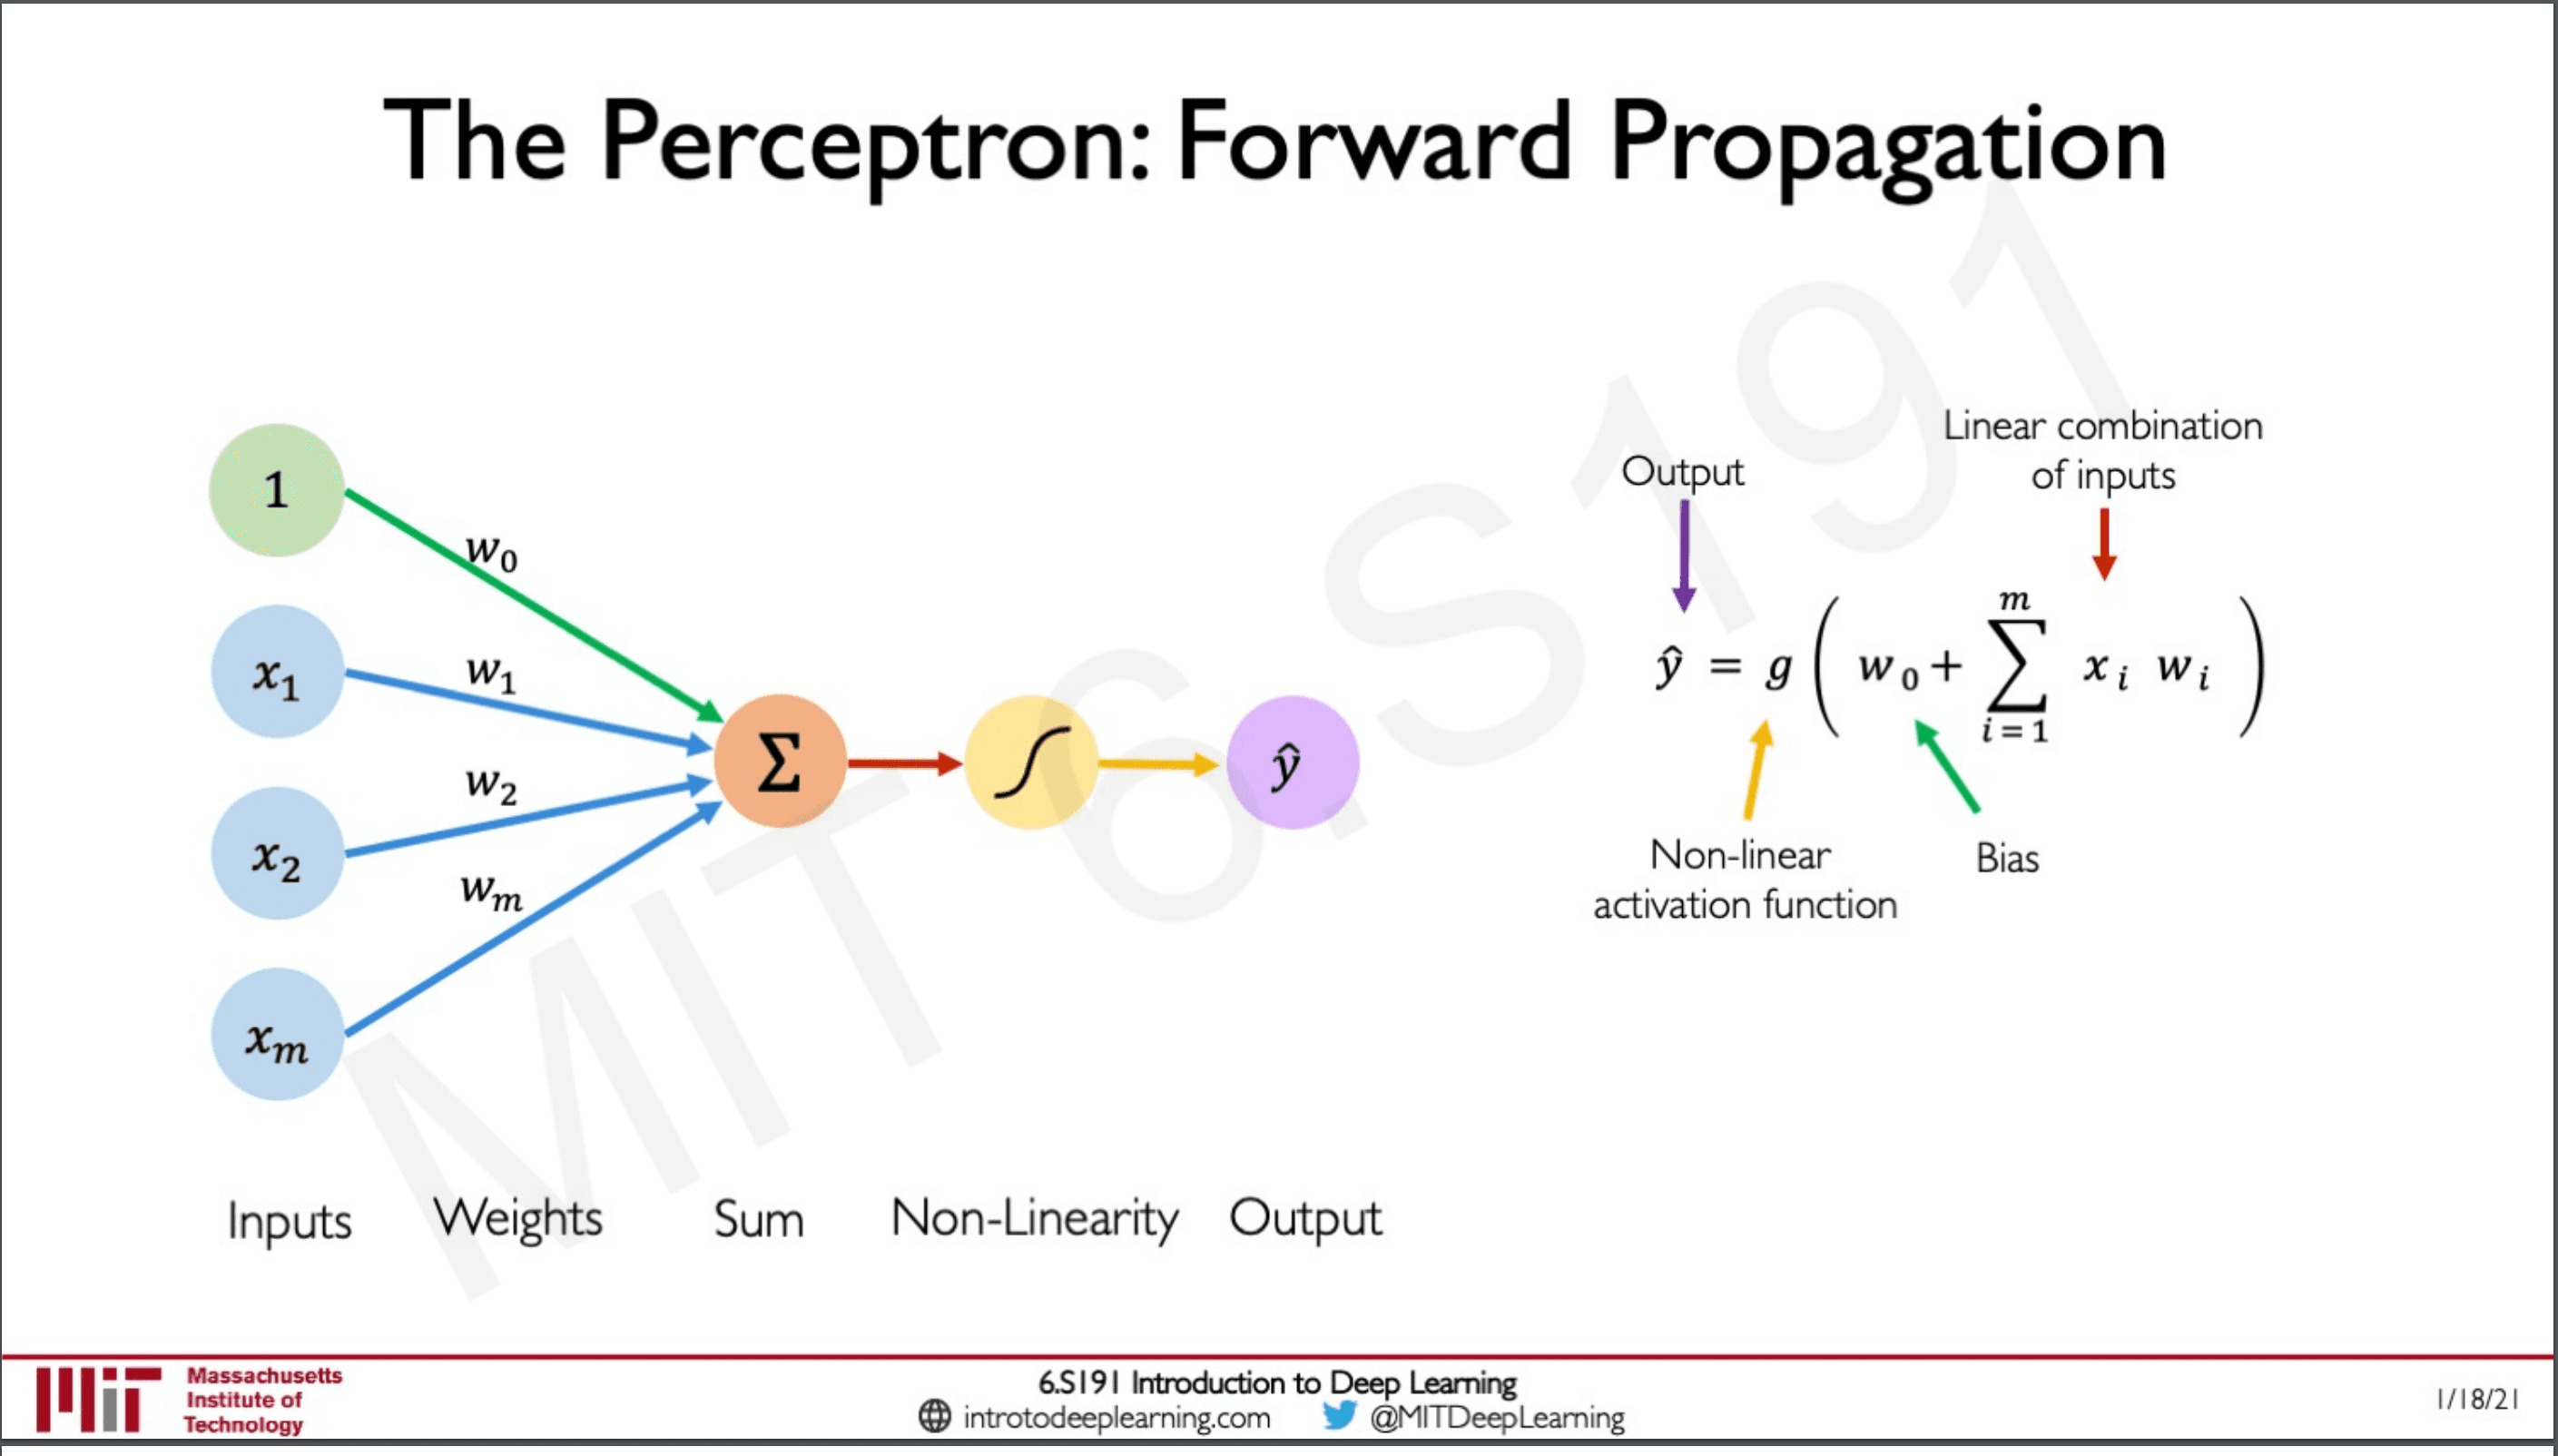
The perceptron also has a bias term which is used to shift the activation function left or right.
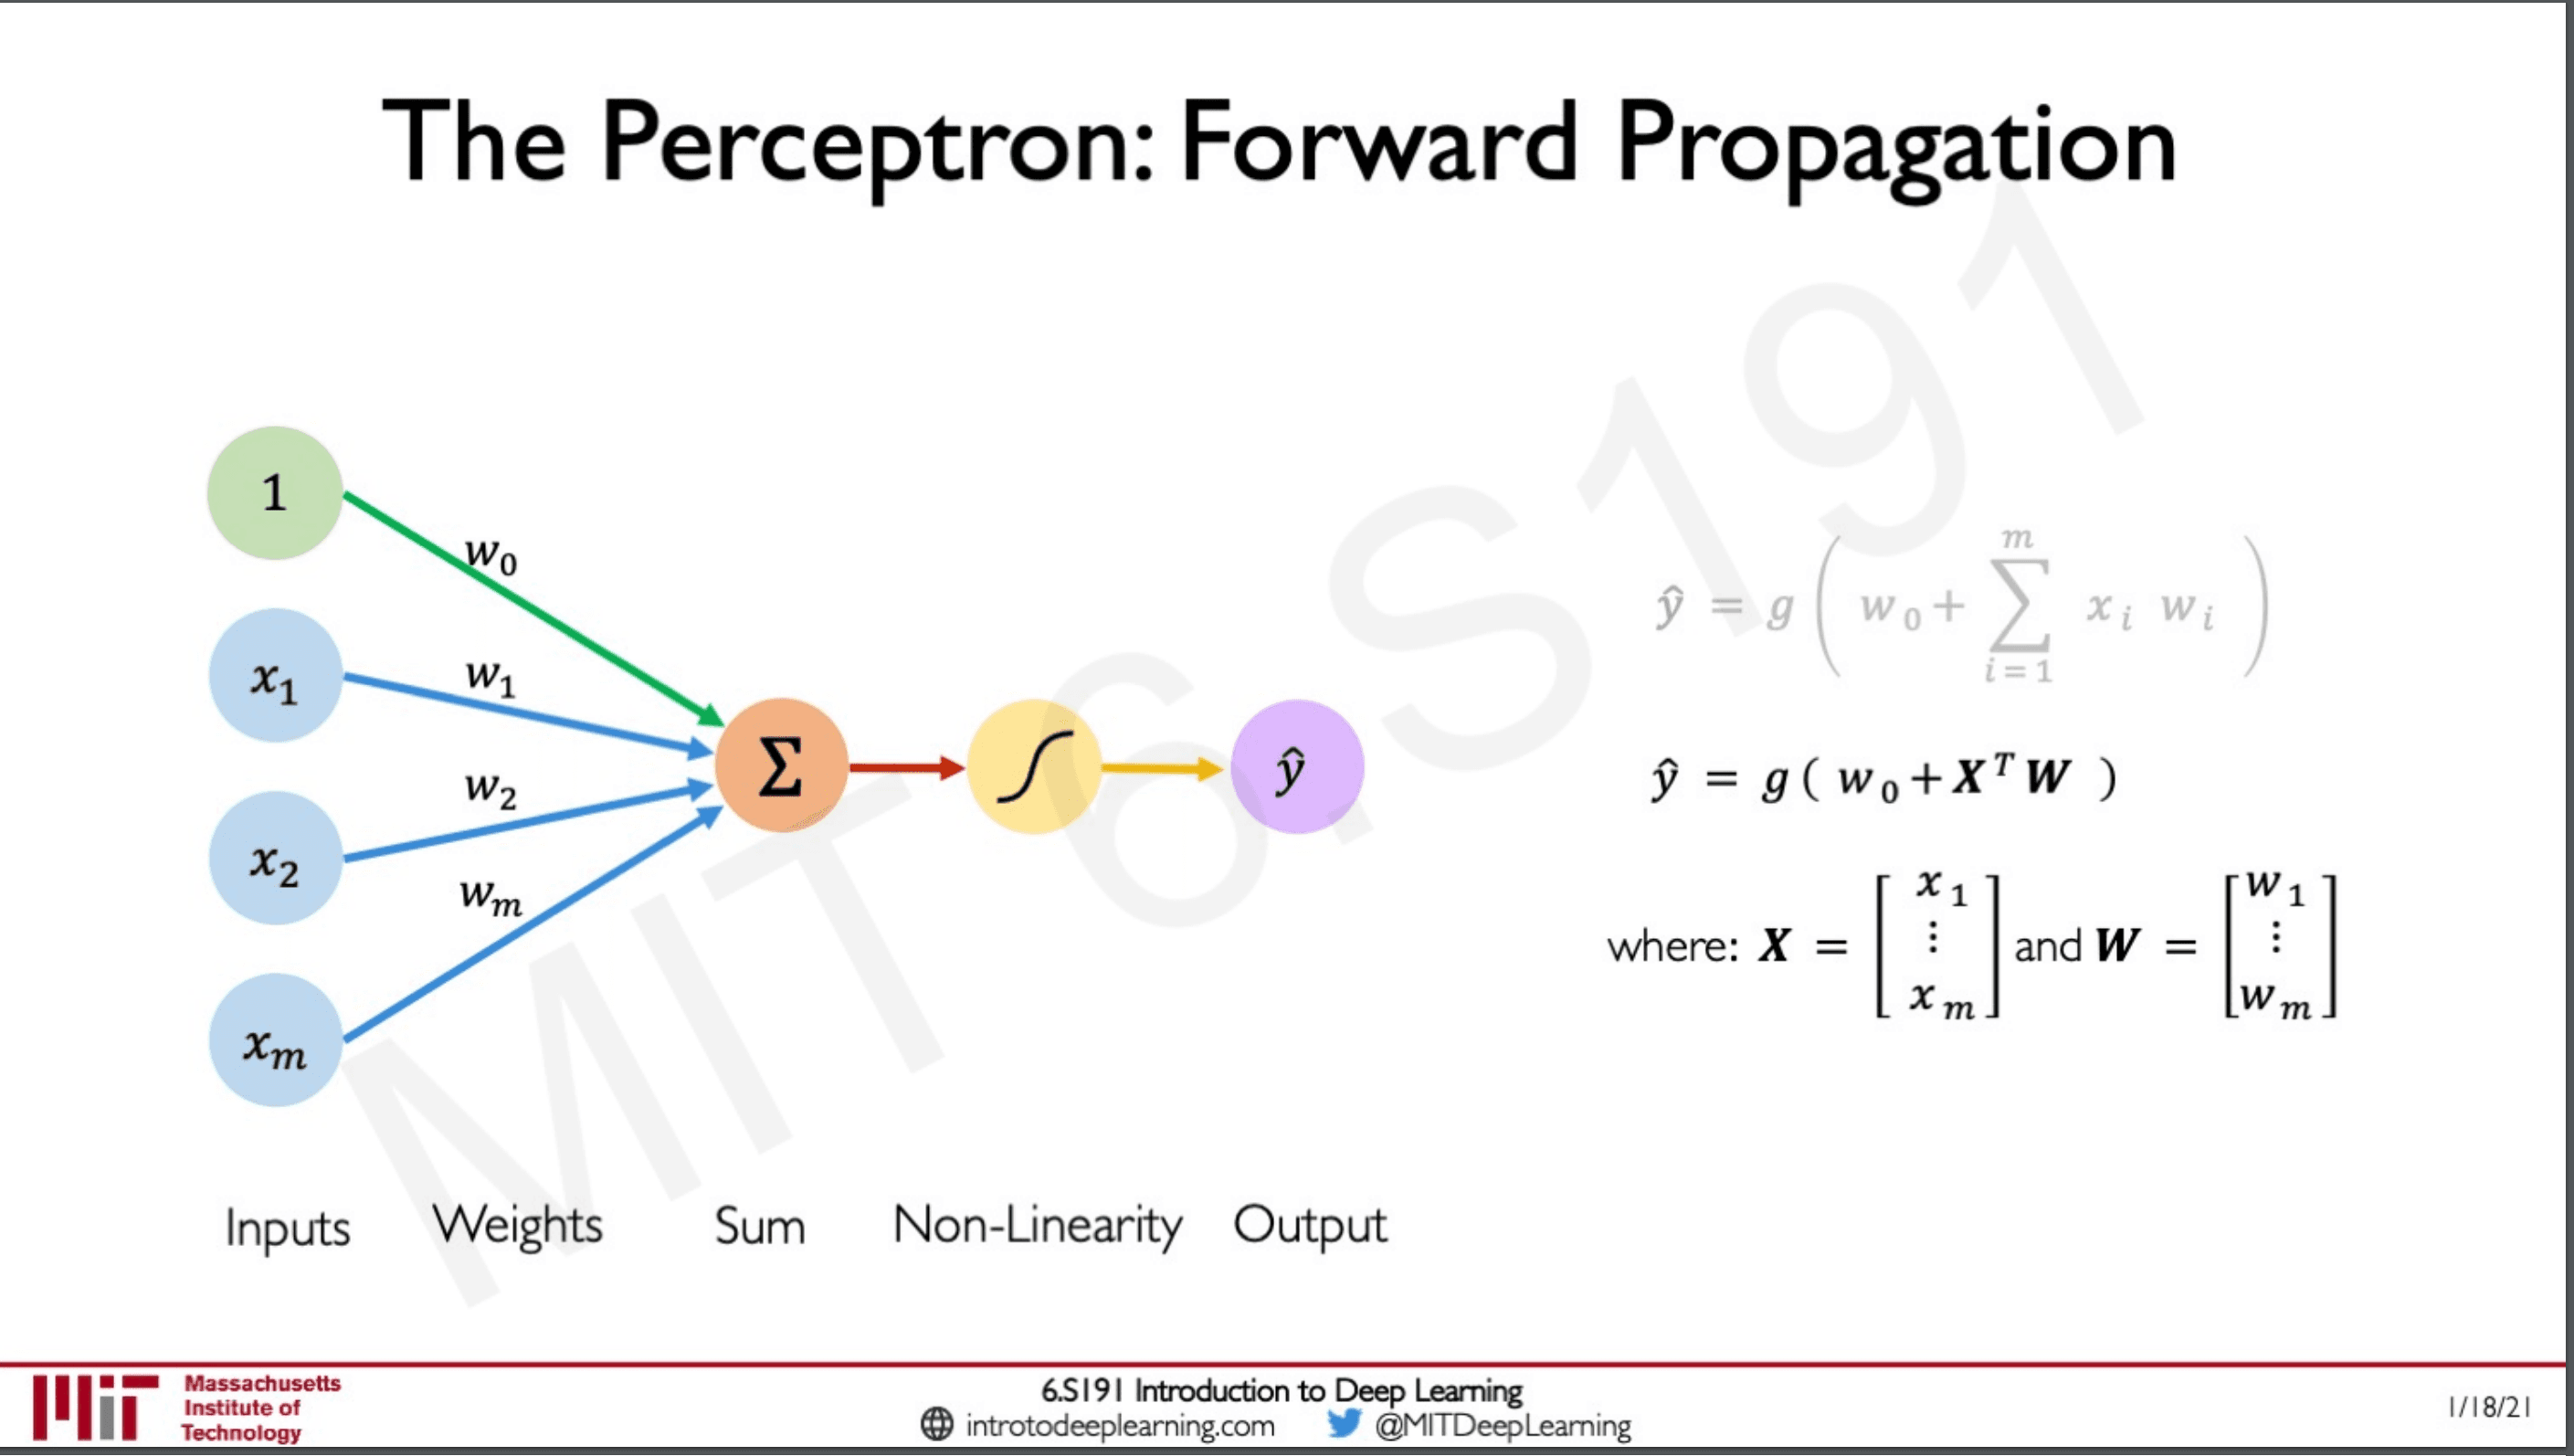
This slides shows the rewrite of the formula in terms of Matrix multiplication and Linear Algebra.
Where X is a vector which has all the input values from toW is a vector which has all the weight values from to
is the bias term
g is the activation function.
The Activation Function
The activation function is a non-linear function that takes in any number as input and converts it to another base on the kind of non-linearity applied.
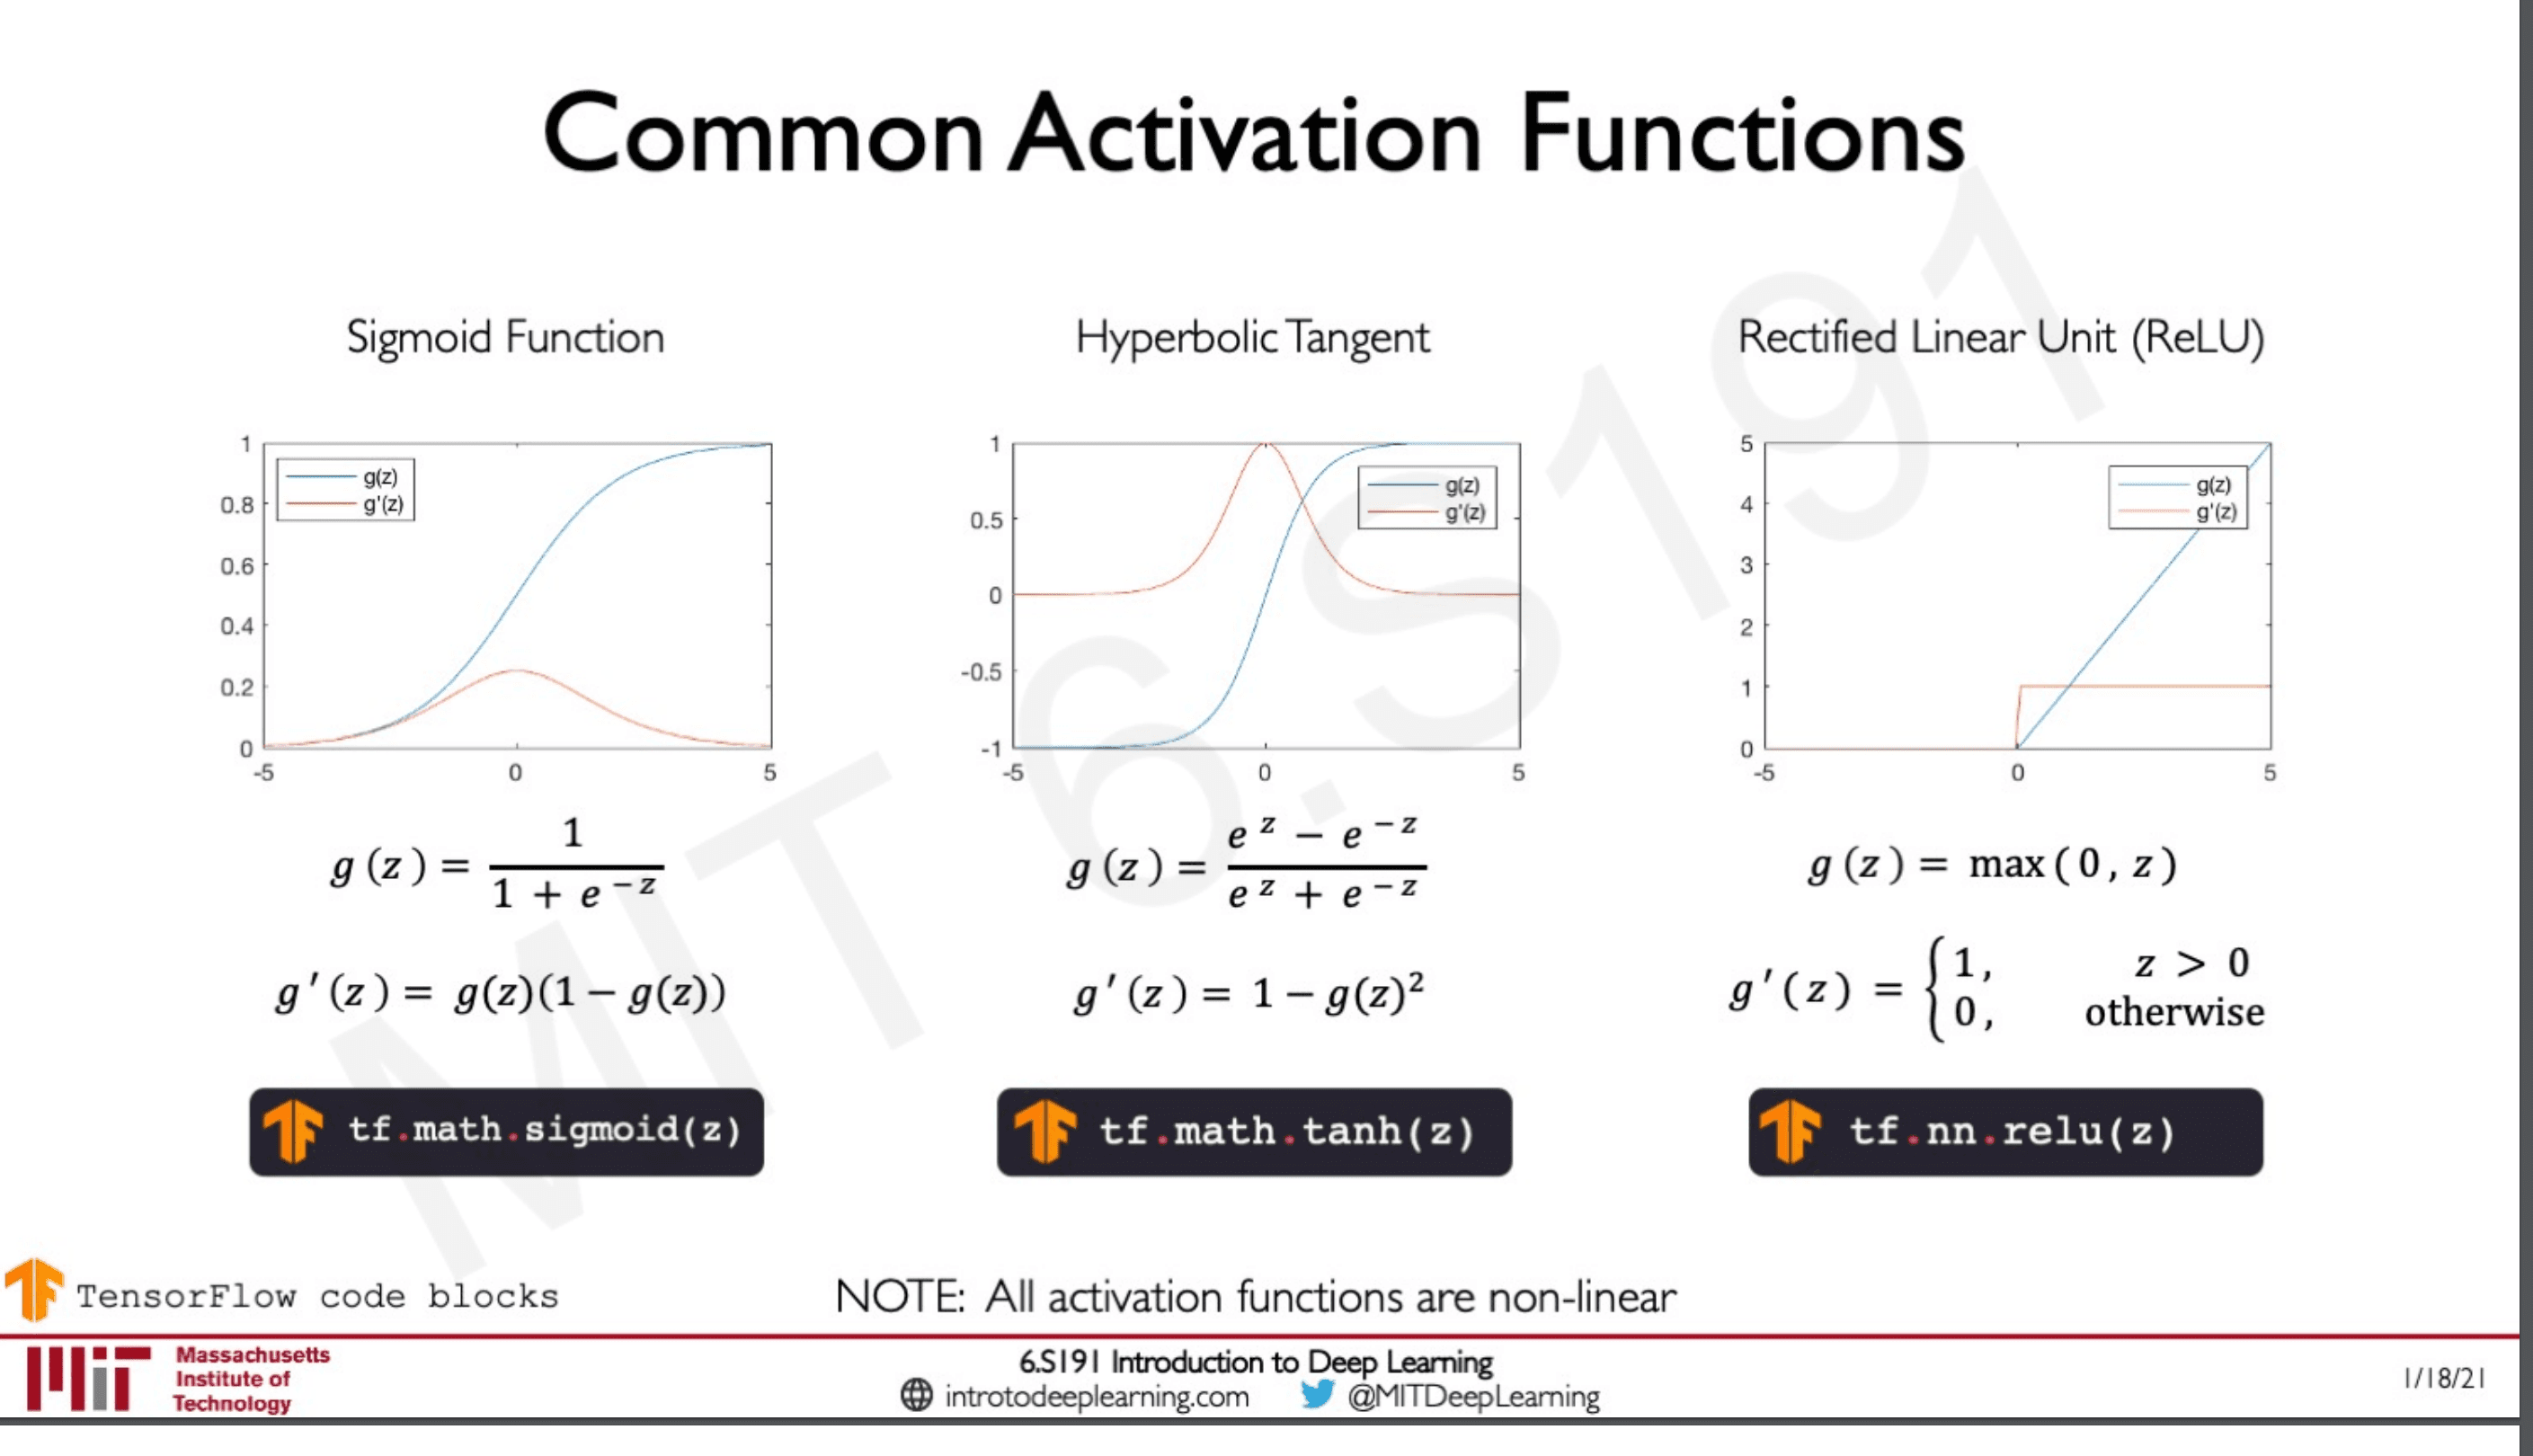
These are some common examples of activation functions.
The sigmoid function is famous as it gives output between 0-1 which are very useful when dealing with problems on probability.
The ReLU activation function is also famous for its simplicity as it converts values form the negative regime to 0 and positive to 1.
Importance of Activation Functions
These functions introduce non-linearity to the neural network. Why is this useful? because when we are dealing with non-linear data that is the data in real life is almost always non-linear so this would help us approximate arbitrary functions in the data we train the network on.
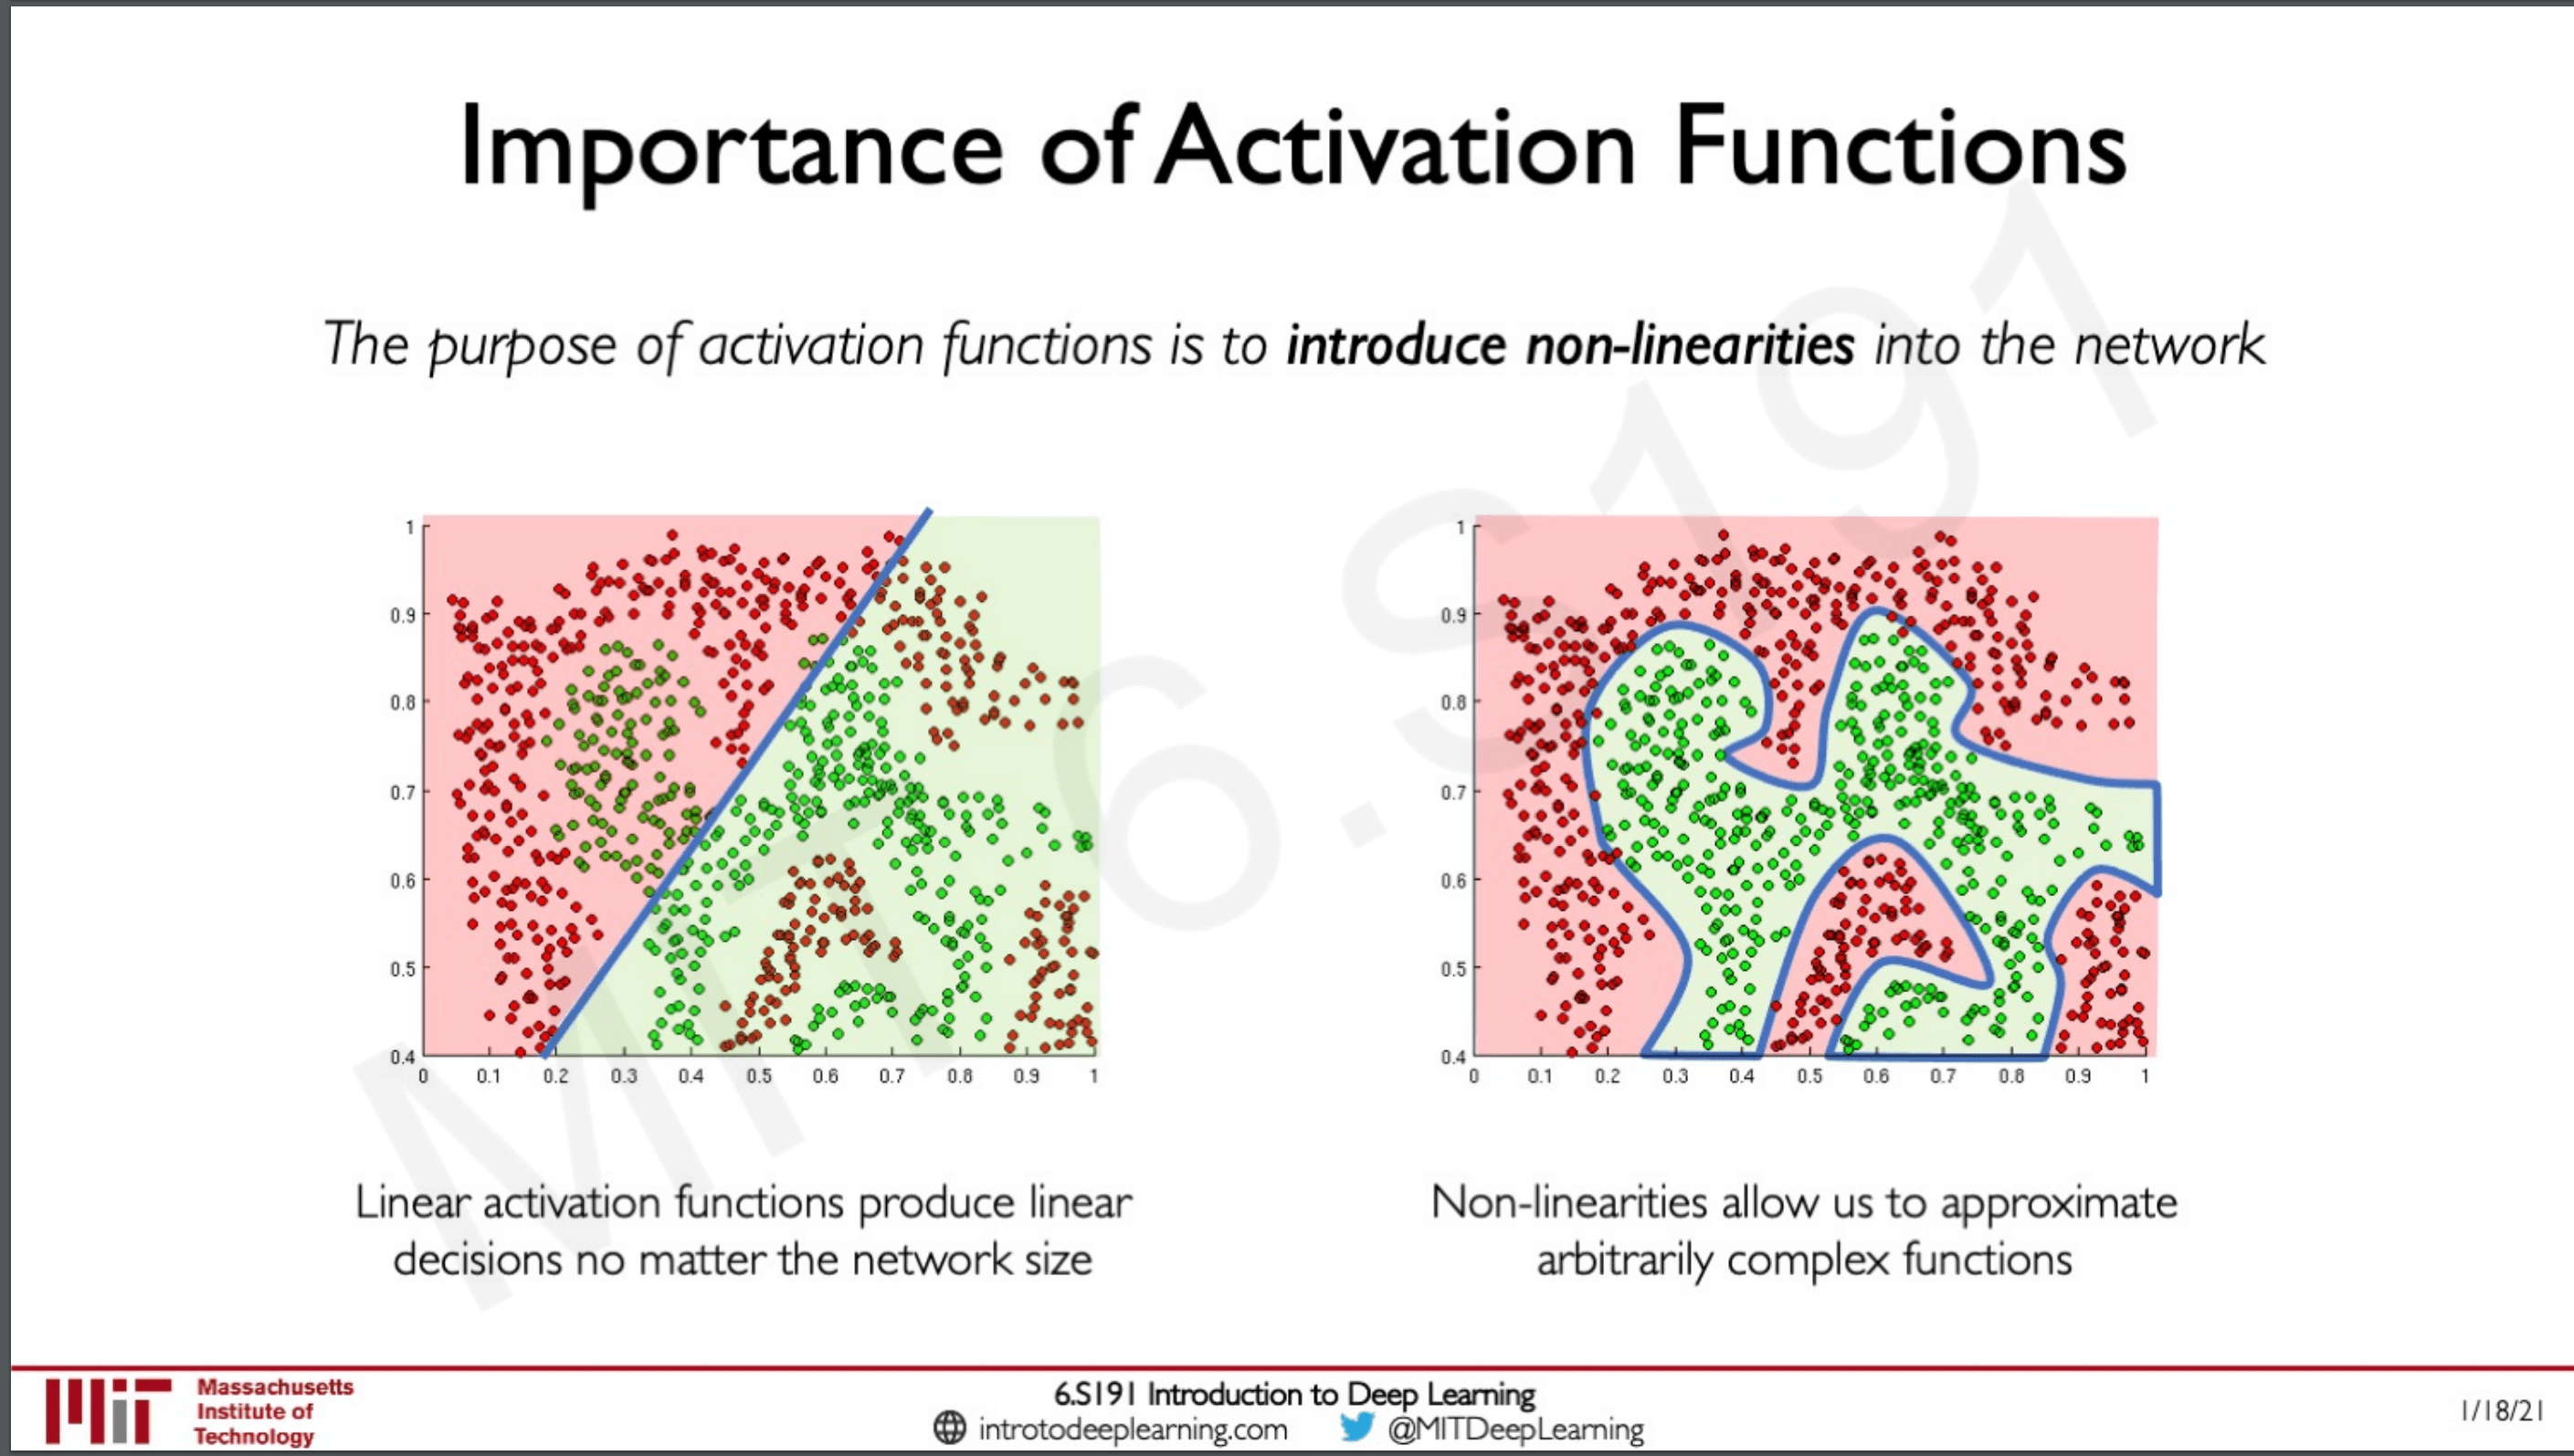
On the left we can see what will happen if we try to create a model that generalises on a linear function but if we use a non linear function we could do something like what we have on the right.
Building Neural Networks with Peceptron
There are three steps in how a peceptron works,
- Dot product between weights and inputs
- Add a bias
- Apply non-linearity
Dense layer from scratch
class MyDenseLayer(tf.keras.layers.Layer):
	def __init__(self,input_dim,output_dim):
		super(MyDenseLayer,self).__init__()

	self.W = self.add_weight([input_dim,output_dim])
	self.b = self.add_weight([1,output_dim])
These prospectors are called dense layers as all the inputs are densely connected.
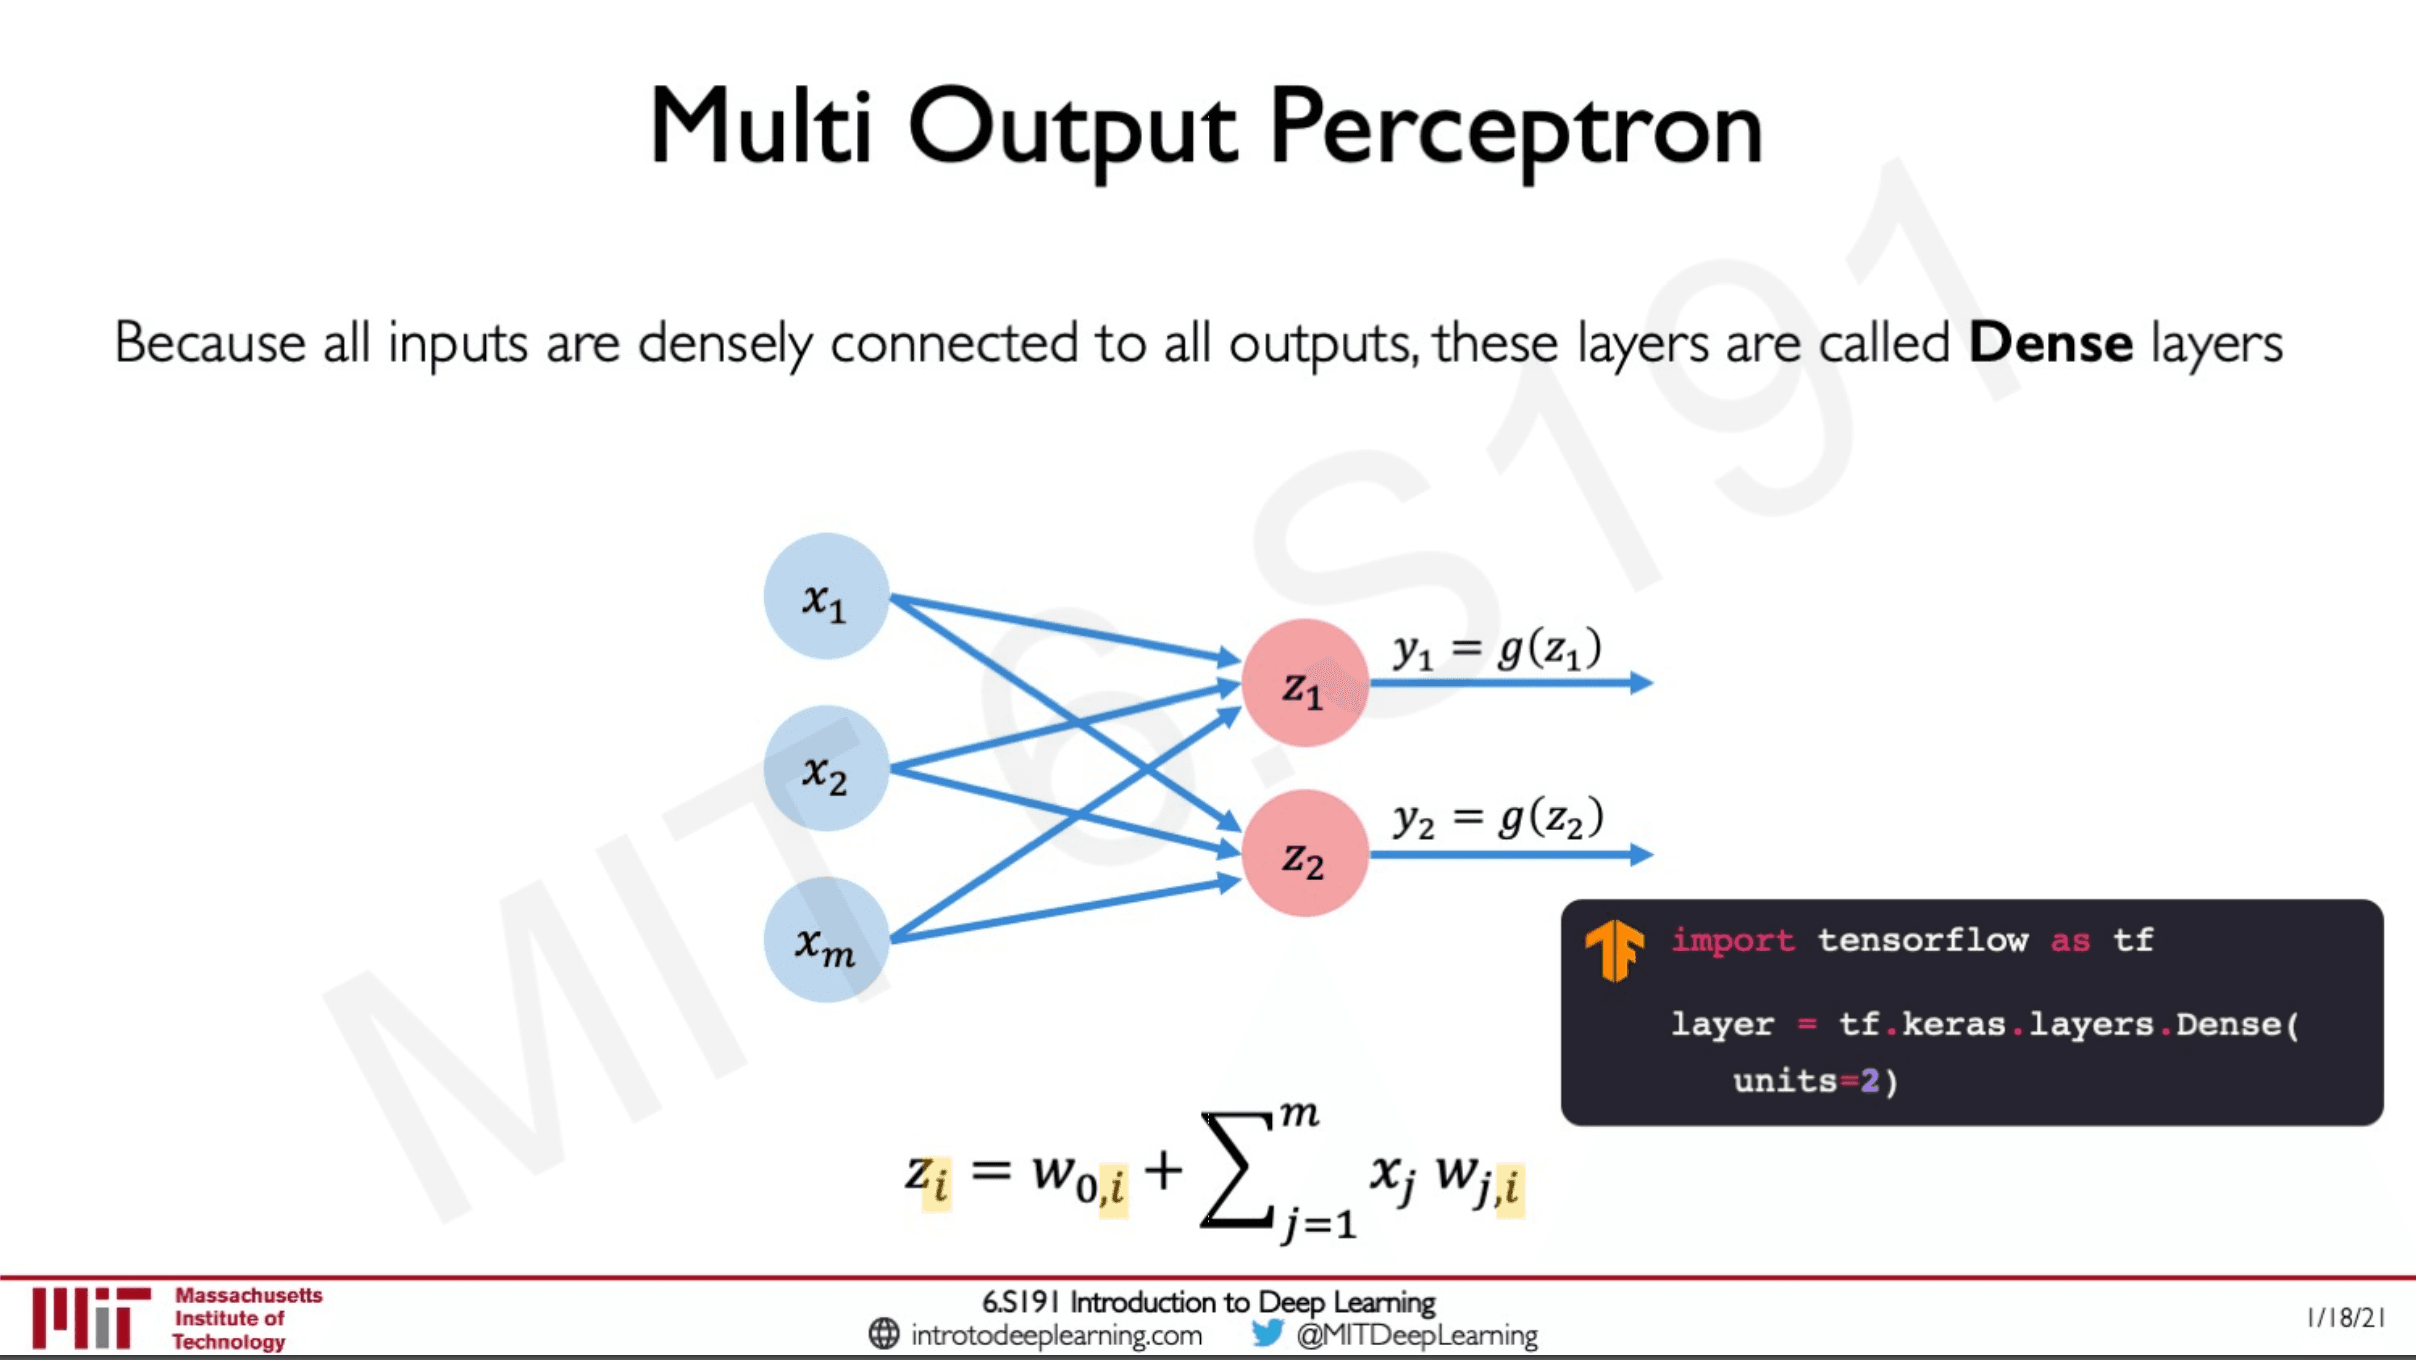
Since there are two layers in the output layer we specify the units = 2
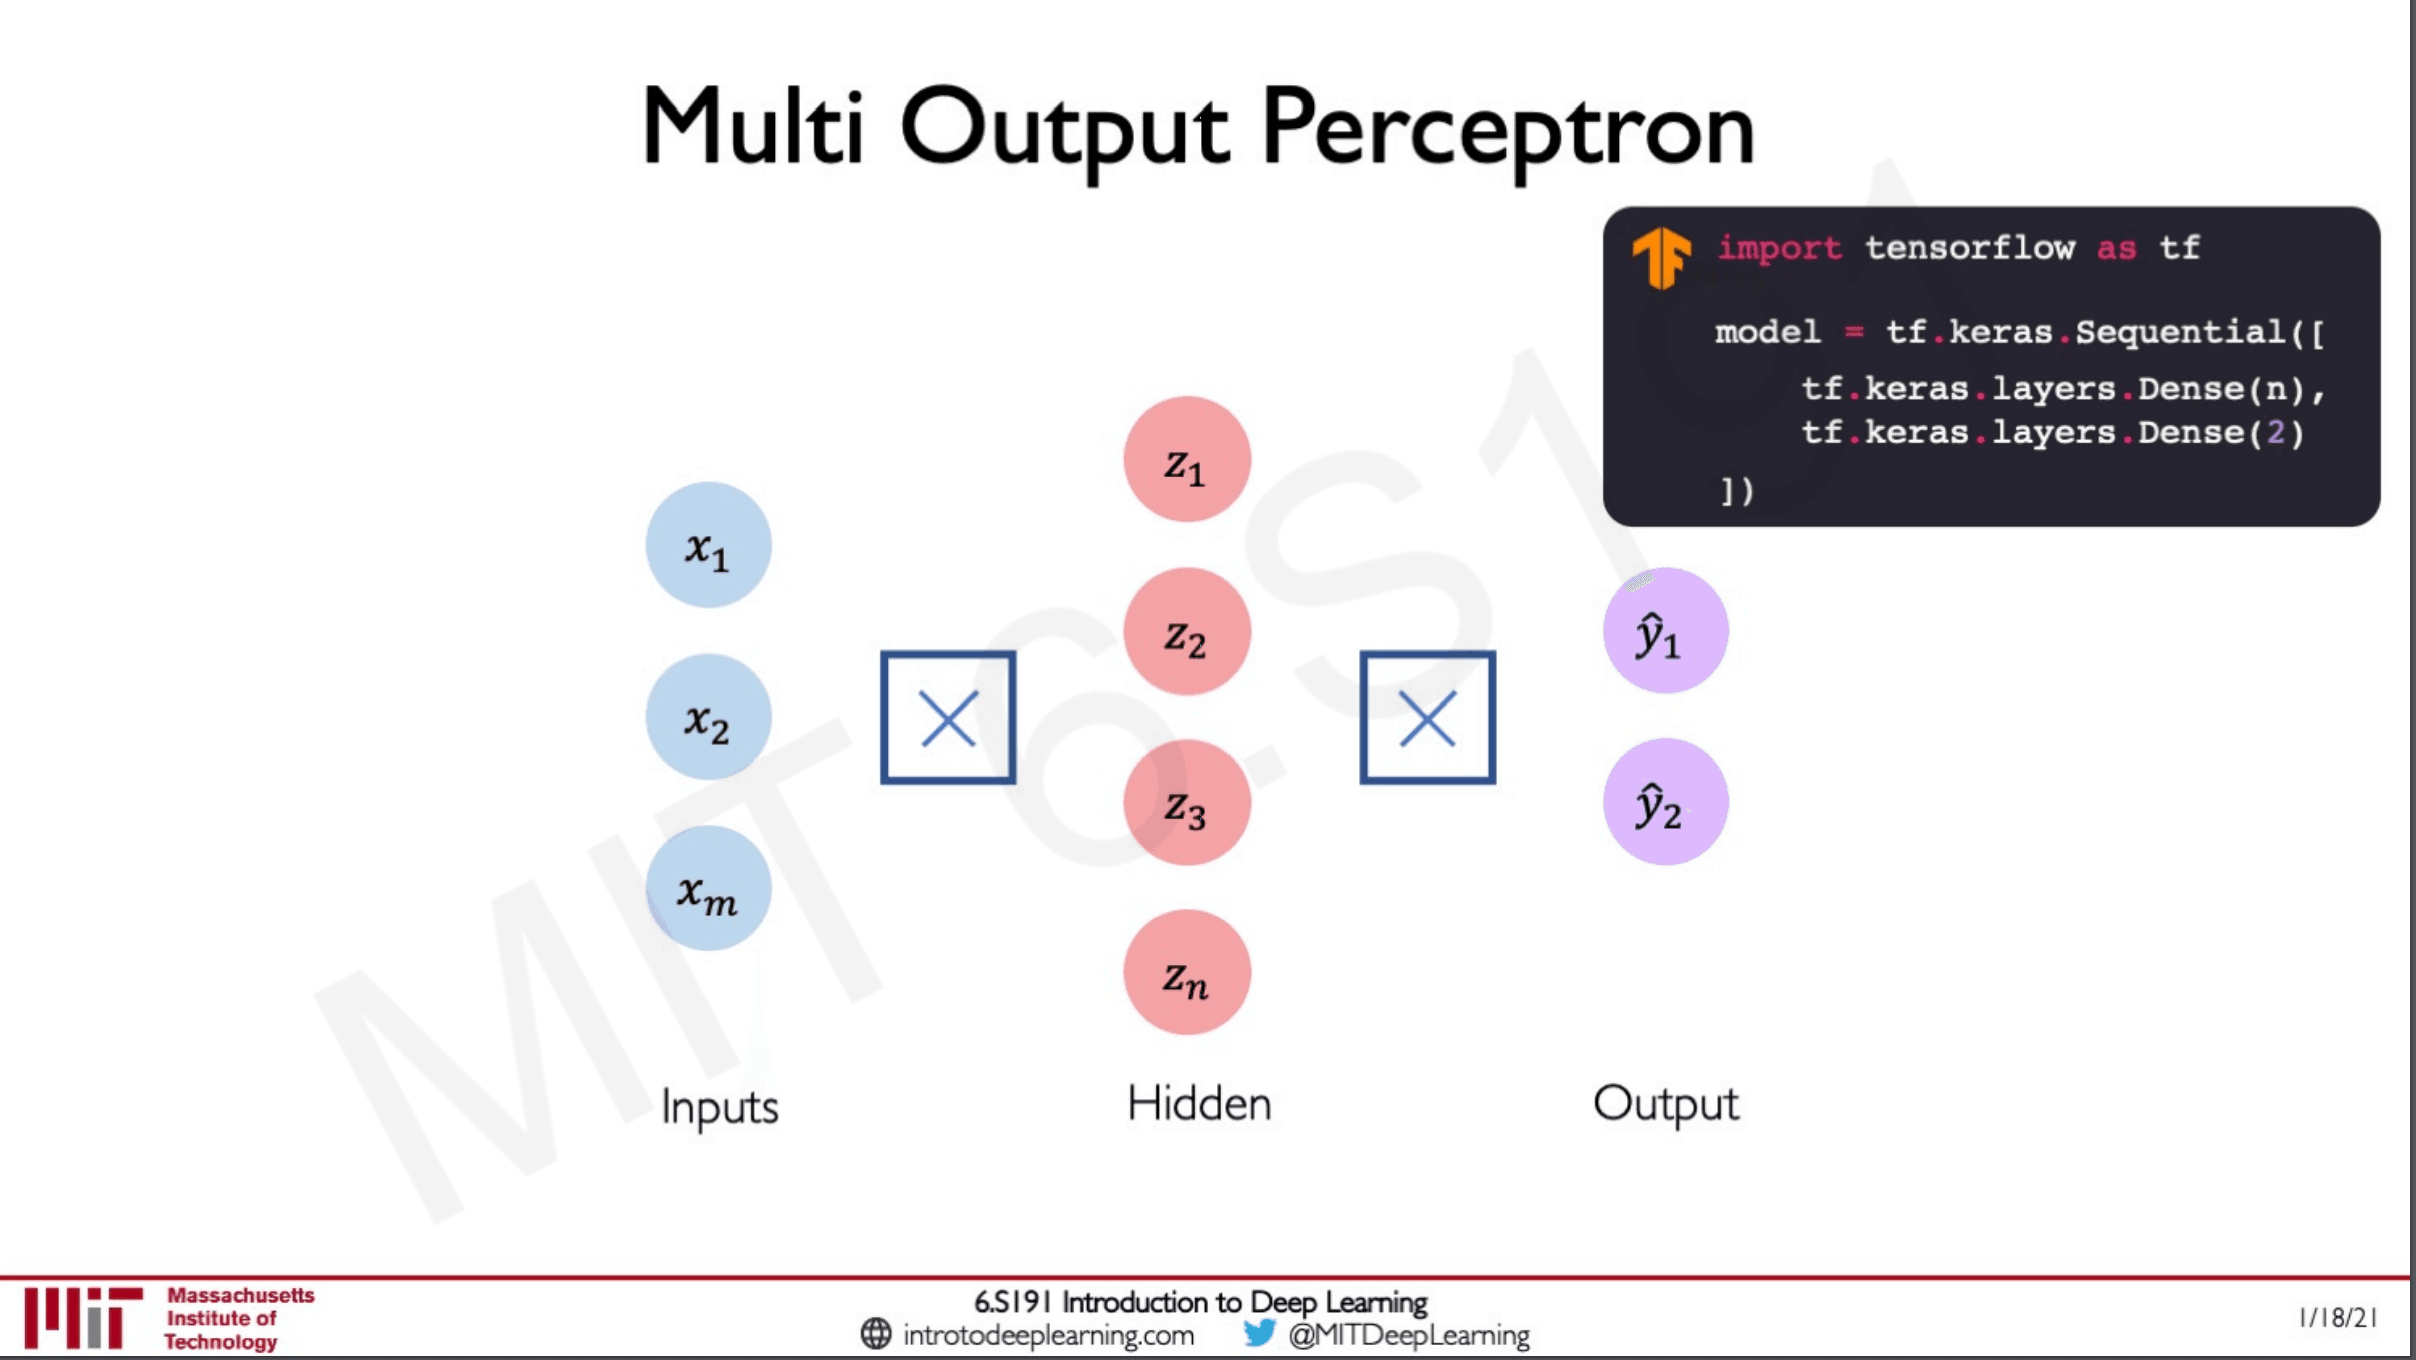
A multi-output perceptron is built by stacking those layers in the code to how we have stacked the layers in the image.
Applying Neural Networks
Let's define a problem for our neural network to solve.
Will I pass this class?
We will be having two feature models
the number of lectures that we attended and hours spent on the final projectFor this case, our dataset would be the data of students who have attended the class in the past years.
This is what the feature space of the data looks like.
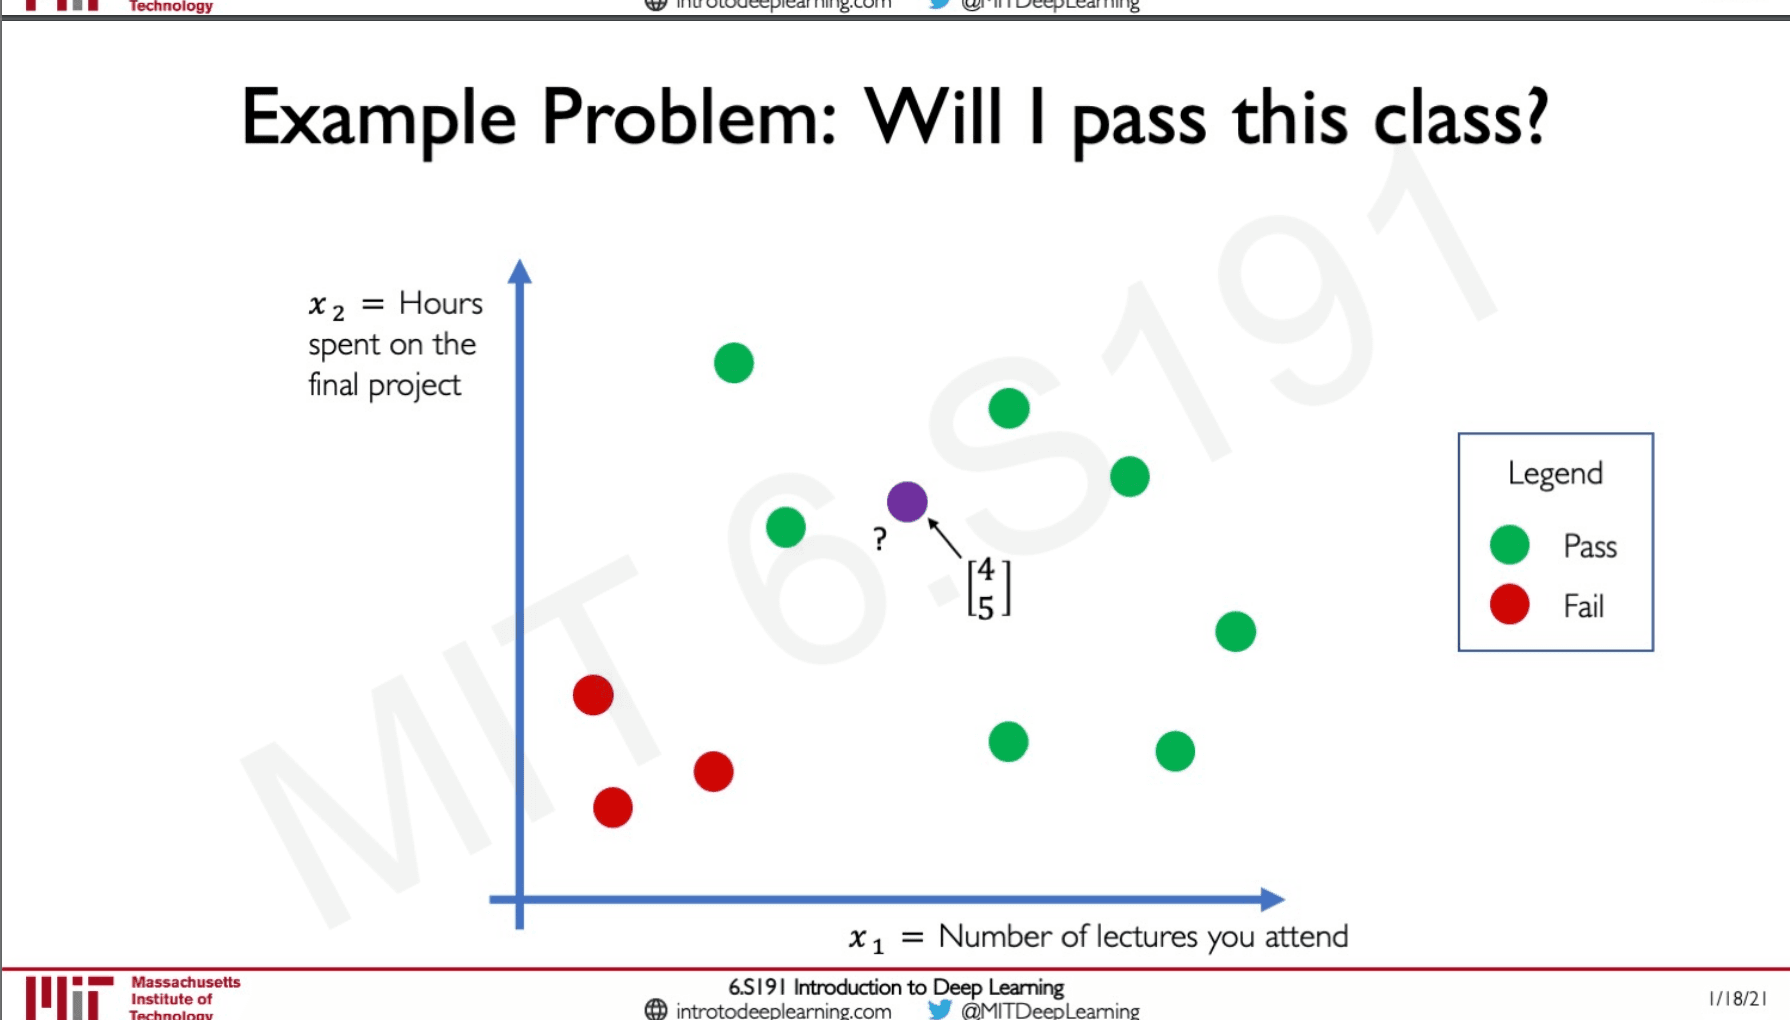
If we put our data here let's say I attended 4 lectures and have spent 5 hours on the project. Looking at the visual we plotted our intuition tells us that we will pass the class.
Let's pass this to a new perceptron with two inputs and and some hidden layers then finally leading upto our output.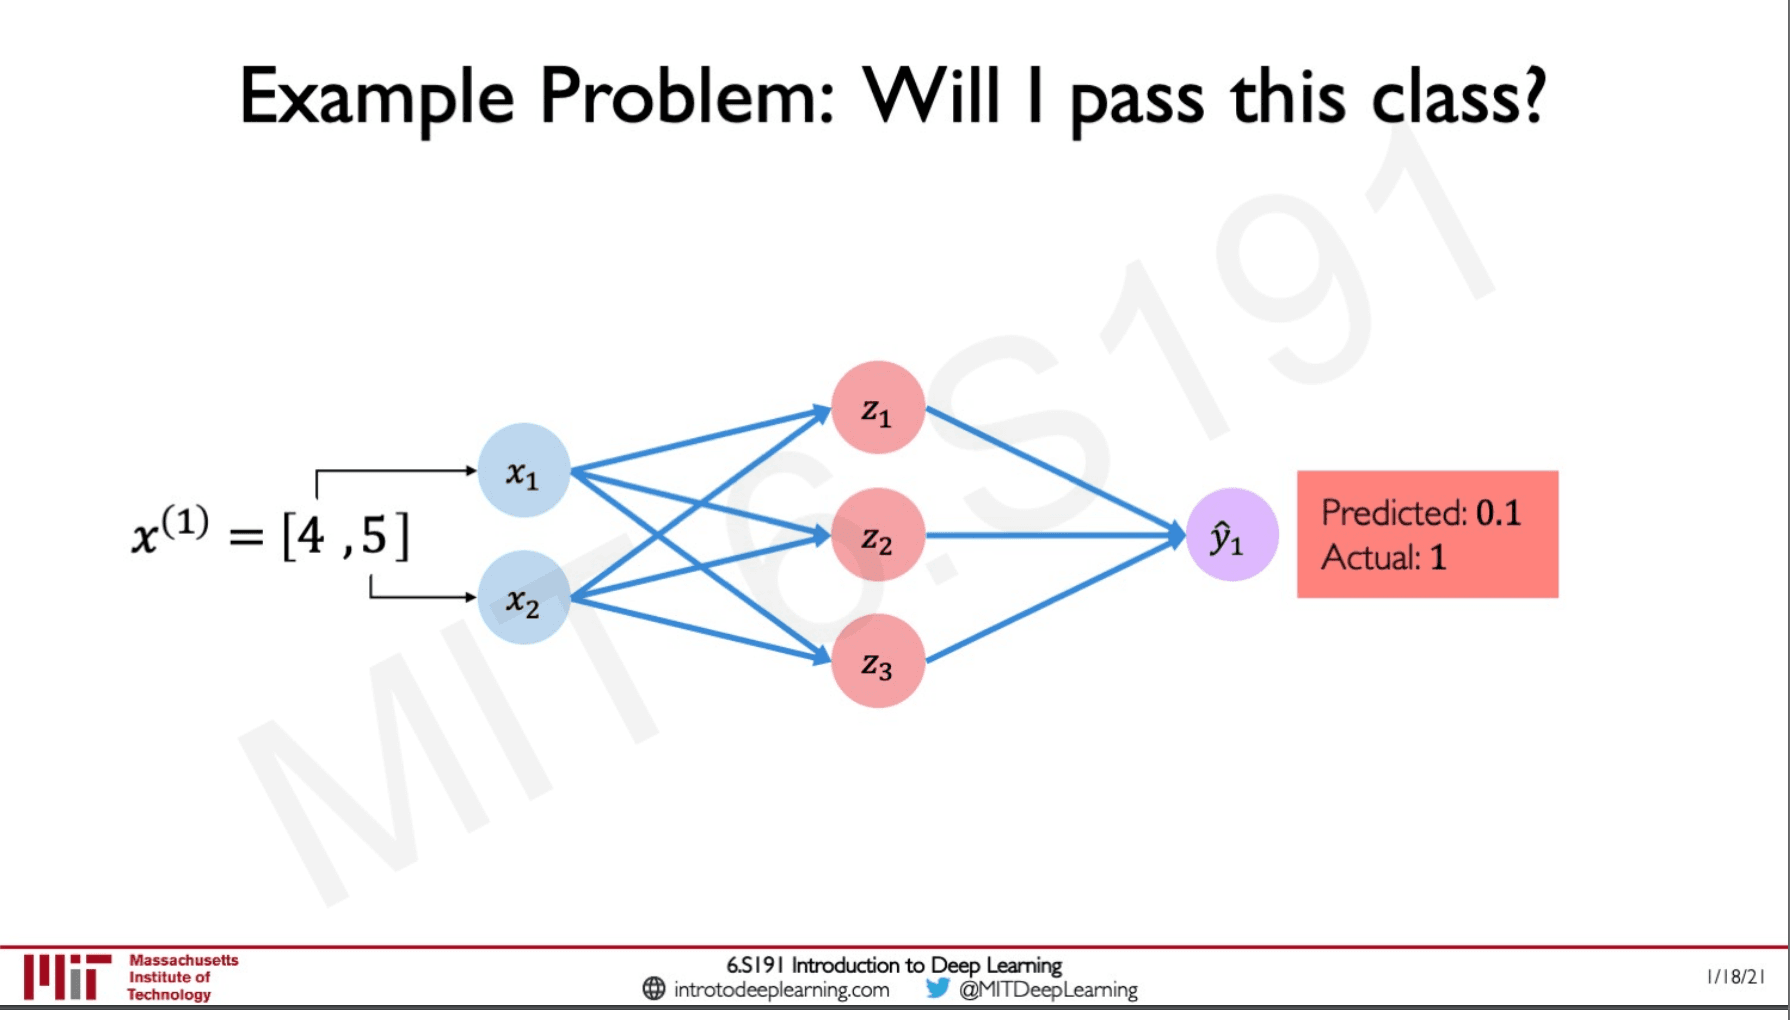
The model shows us that the output is 0.1 which means there is only a 10% chance of passing whereas from what we understood by plotting our data is that there is a 100% chance of passing. Why did this happen?
This is because this perceptron has never been trained before and it has not seen the data unlike us so the output is pretty much a random guess.
We need to train the model to understand what a bad prediction is.
Loss function
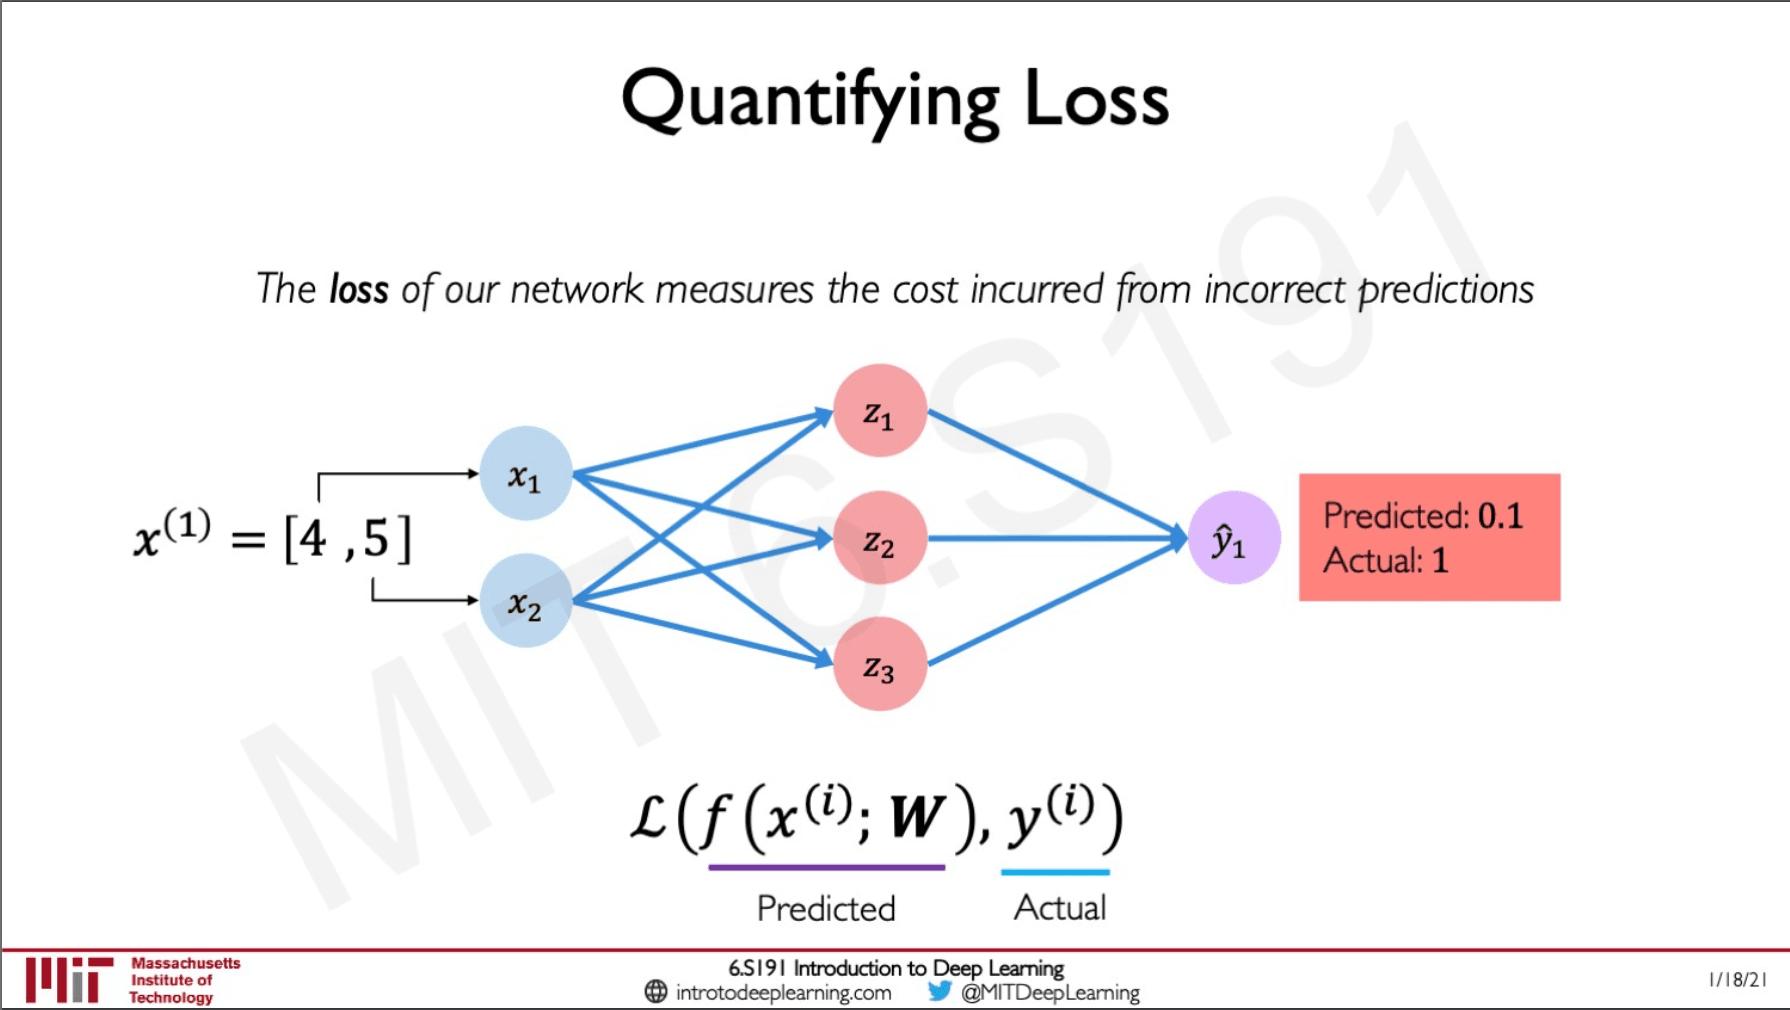
The loss function serves by telling the model how much off is its prediction is, it is like a distance between the ground truth and the prediction. If the predicted value and the ground truth is far apart it means that the model is predicting very badly and if it is very close the loss is small.
Empirical Loss
This is the average or mean loss across the entire dataset.
Generally, when we train our network we need to train a model that would minimise the empirical loss across the entire dataset.

This binary cross-entropy loss is used when we need to make a binary output as in Yes or No for if we would pass this class or not.
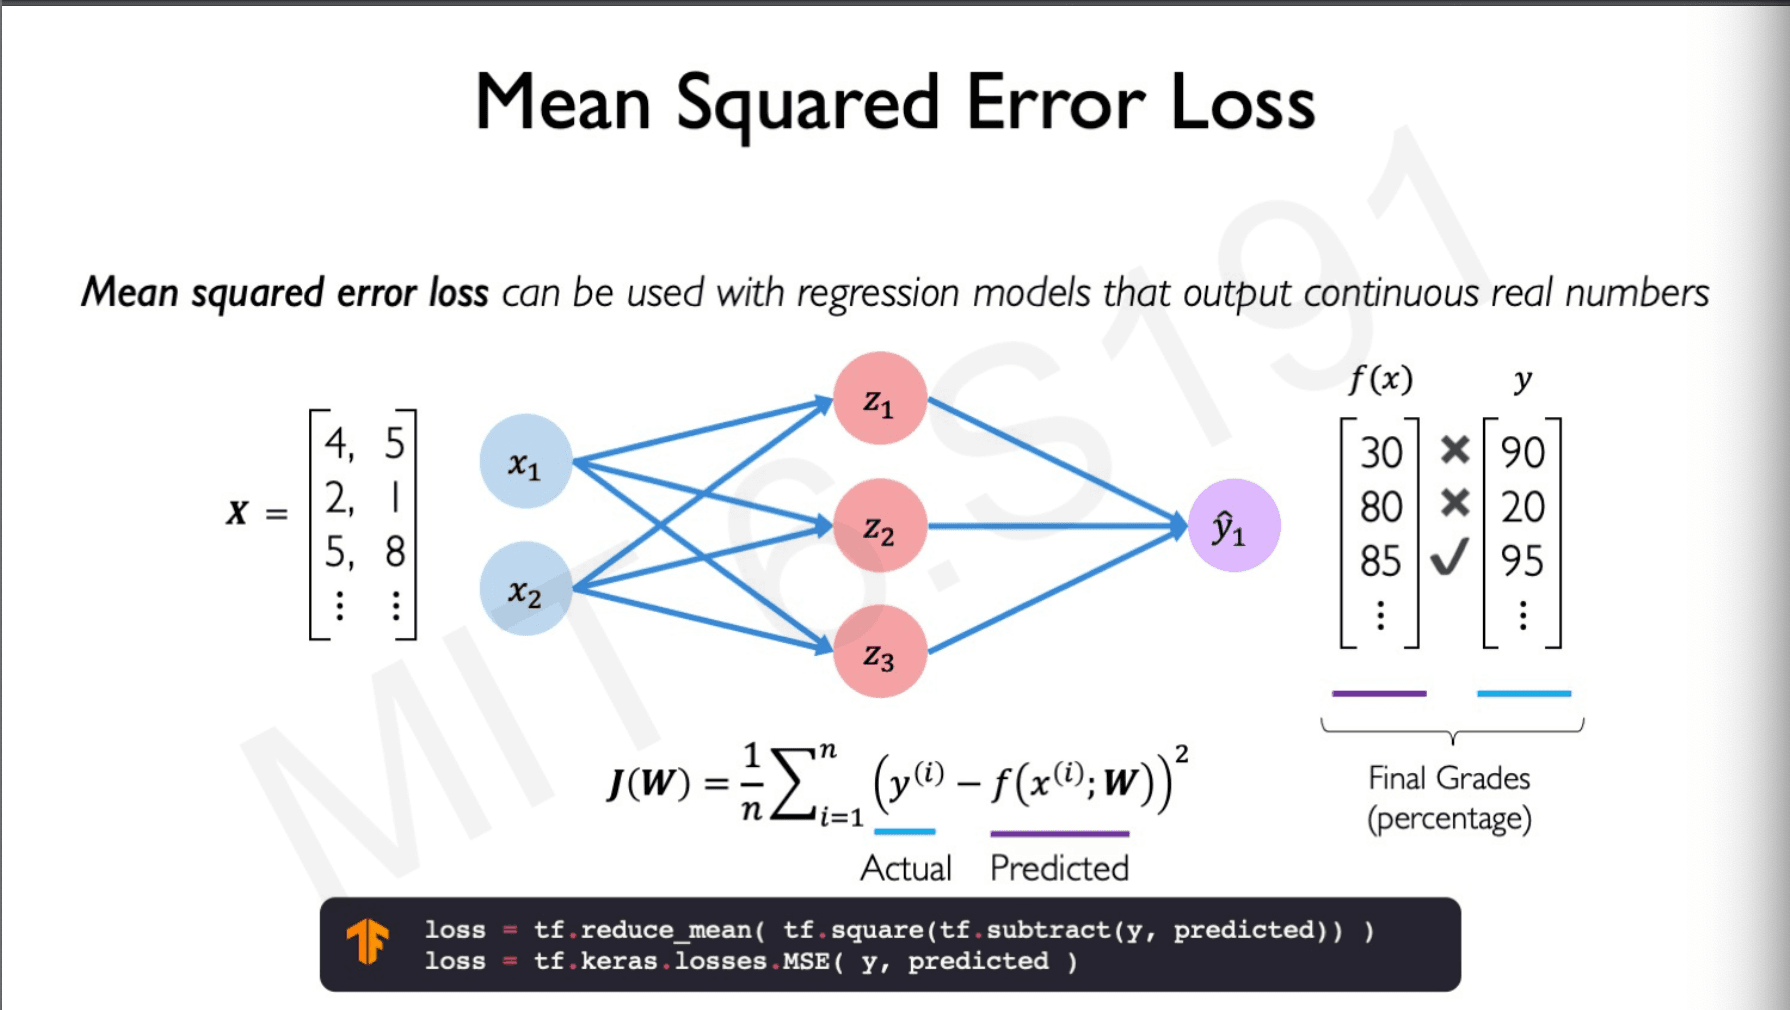
Mean squared error can be used when we are dealing with a problem where we need a number as output.
Training Neural Networks
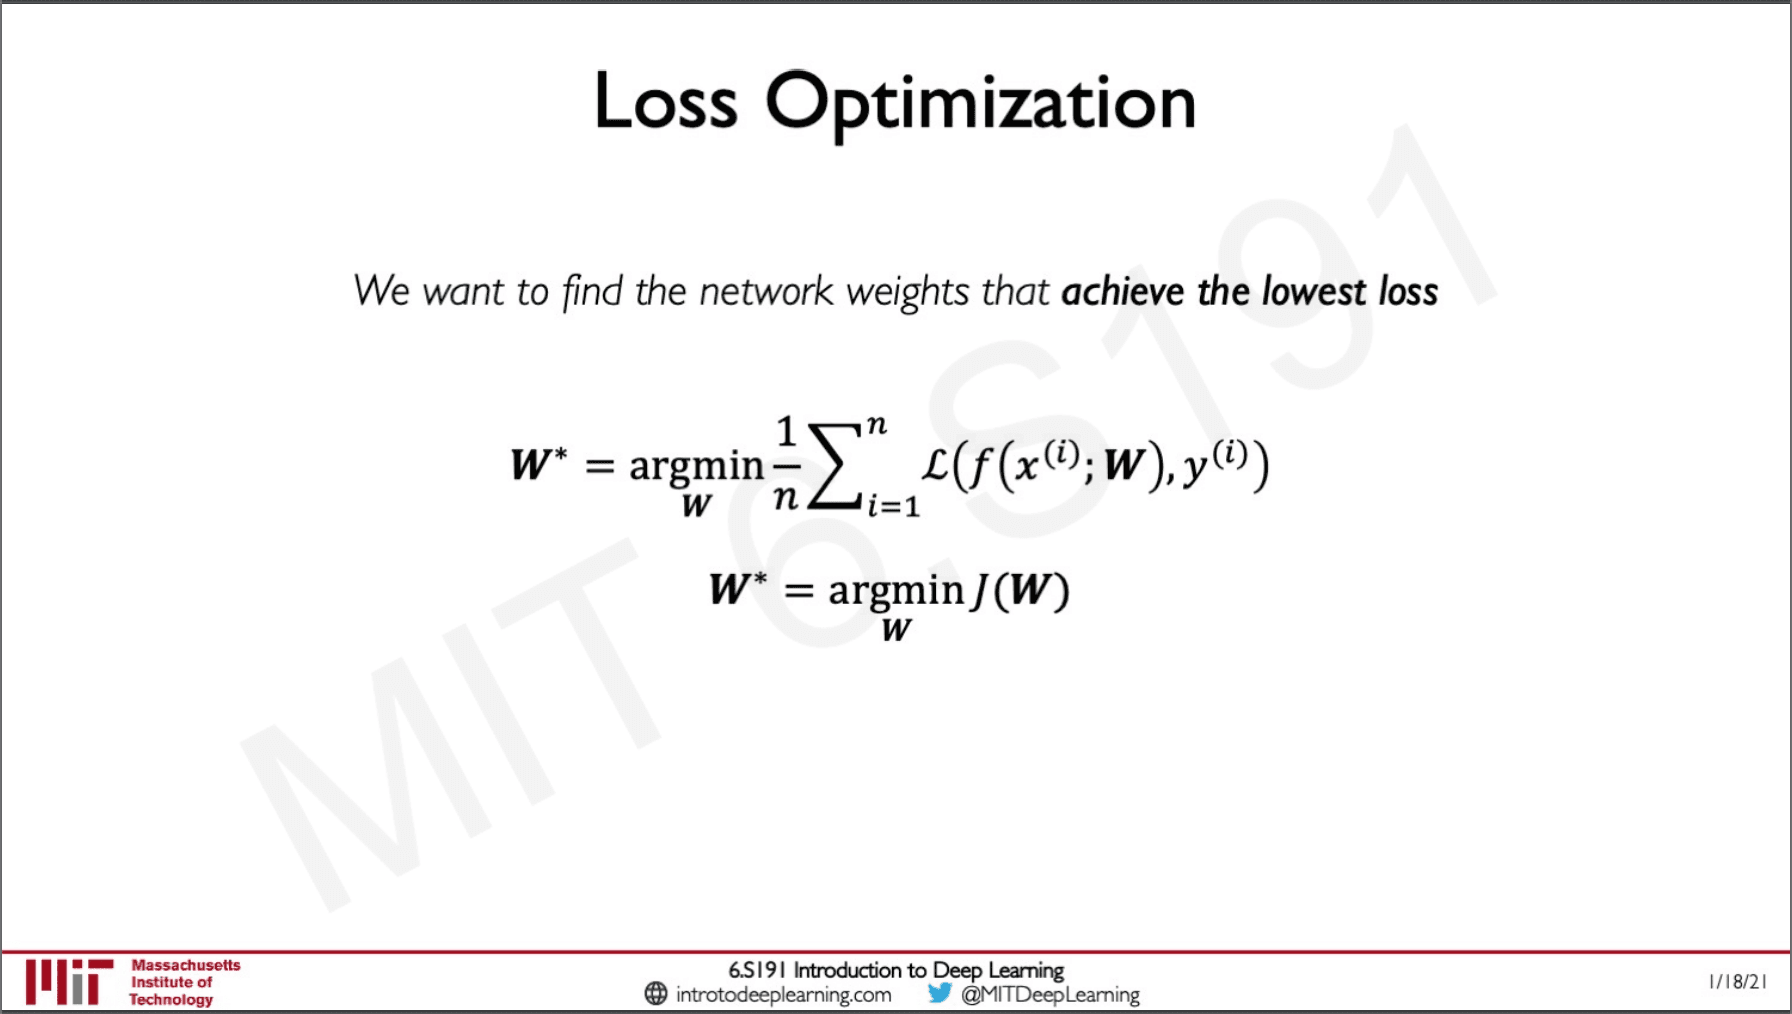
The idea is that we should be able to minimise loss and while we are at it we need to find the weights in such a way that when we pass input to the network the output would give minimum loss.
If we have only 2 weights we can plot the loss as a landscape as shown below.
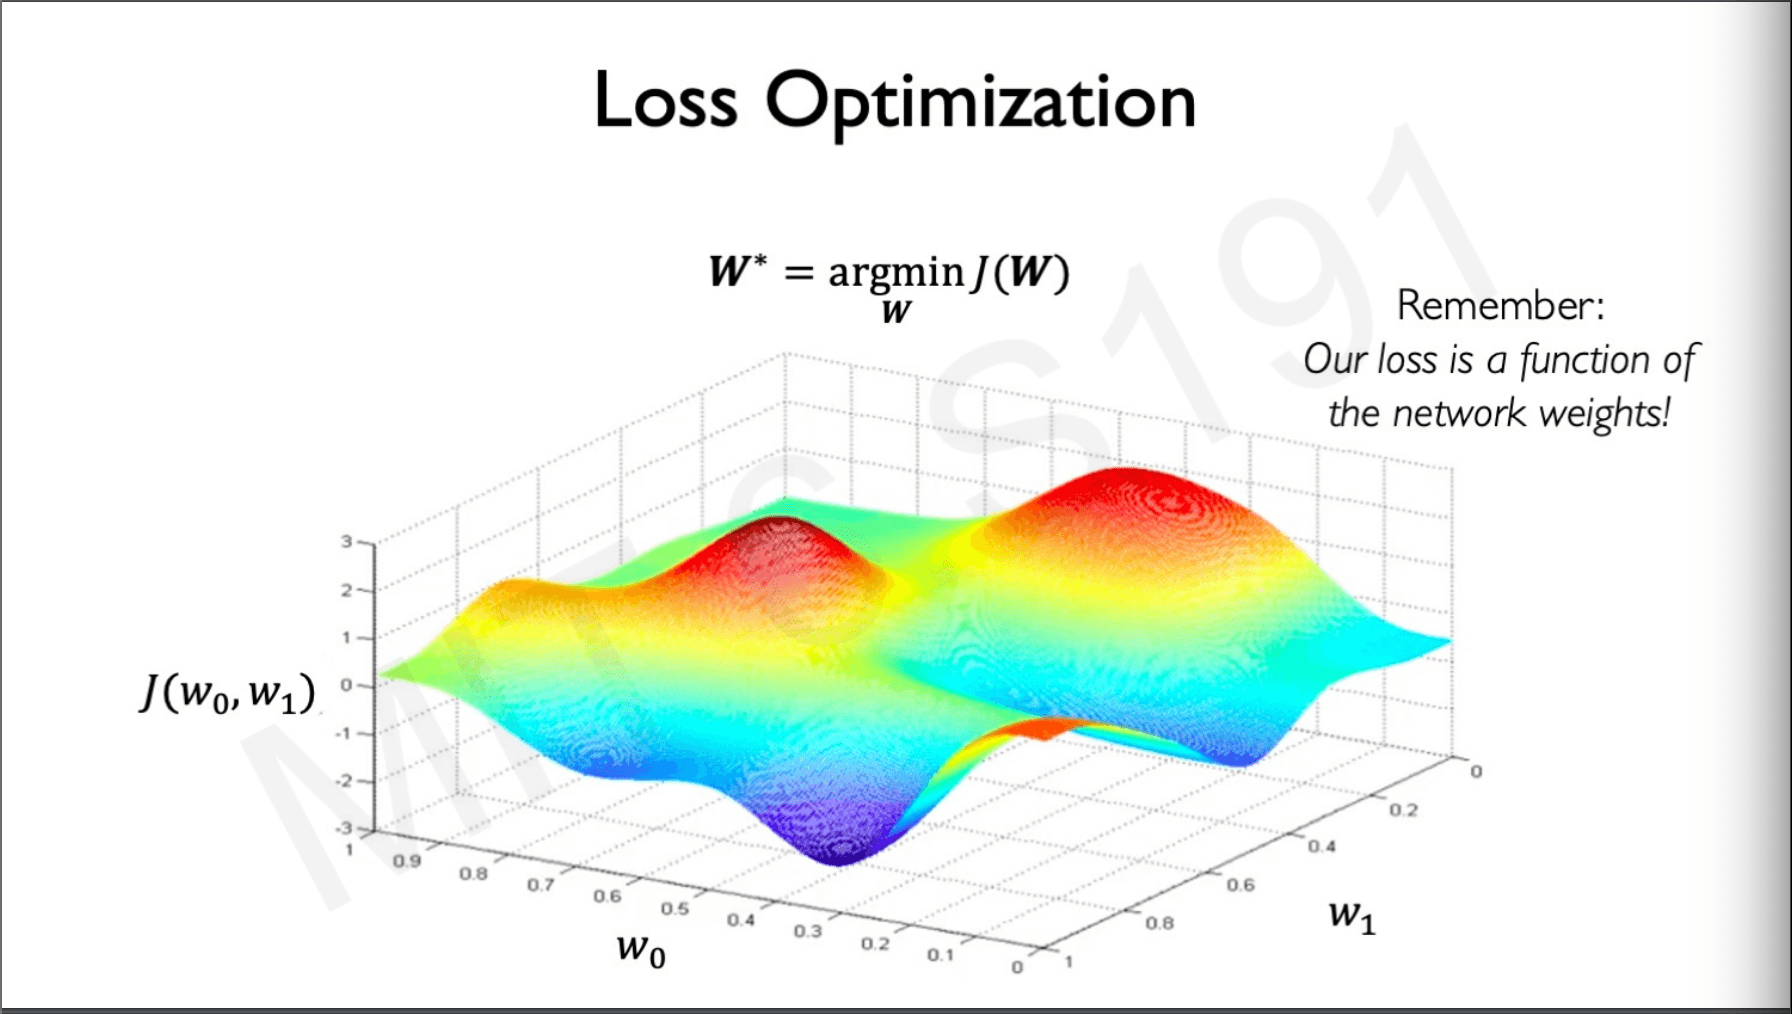
The goal is to find the lowest point in this loss landscape that define our w0 and w1 to do that we have to follow these steps.
- Pick a Random point (,)
- Computer the gradient of that point with respect to weight
- The gradient tells us the direction to go up the loss but we need to do the opposite so we travel in the opposite direction in small steps.
- We find the gradient there and repeat the process until we converge.
This may not be the global minima but at-lease we will reach a local minimum. This algorithm is called gradient descent.
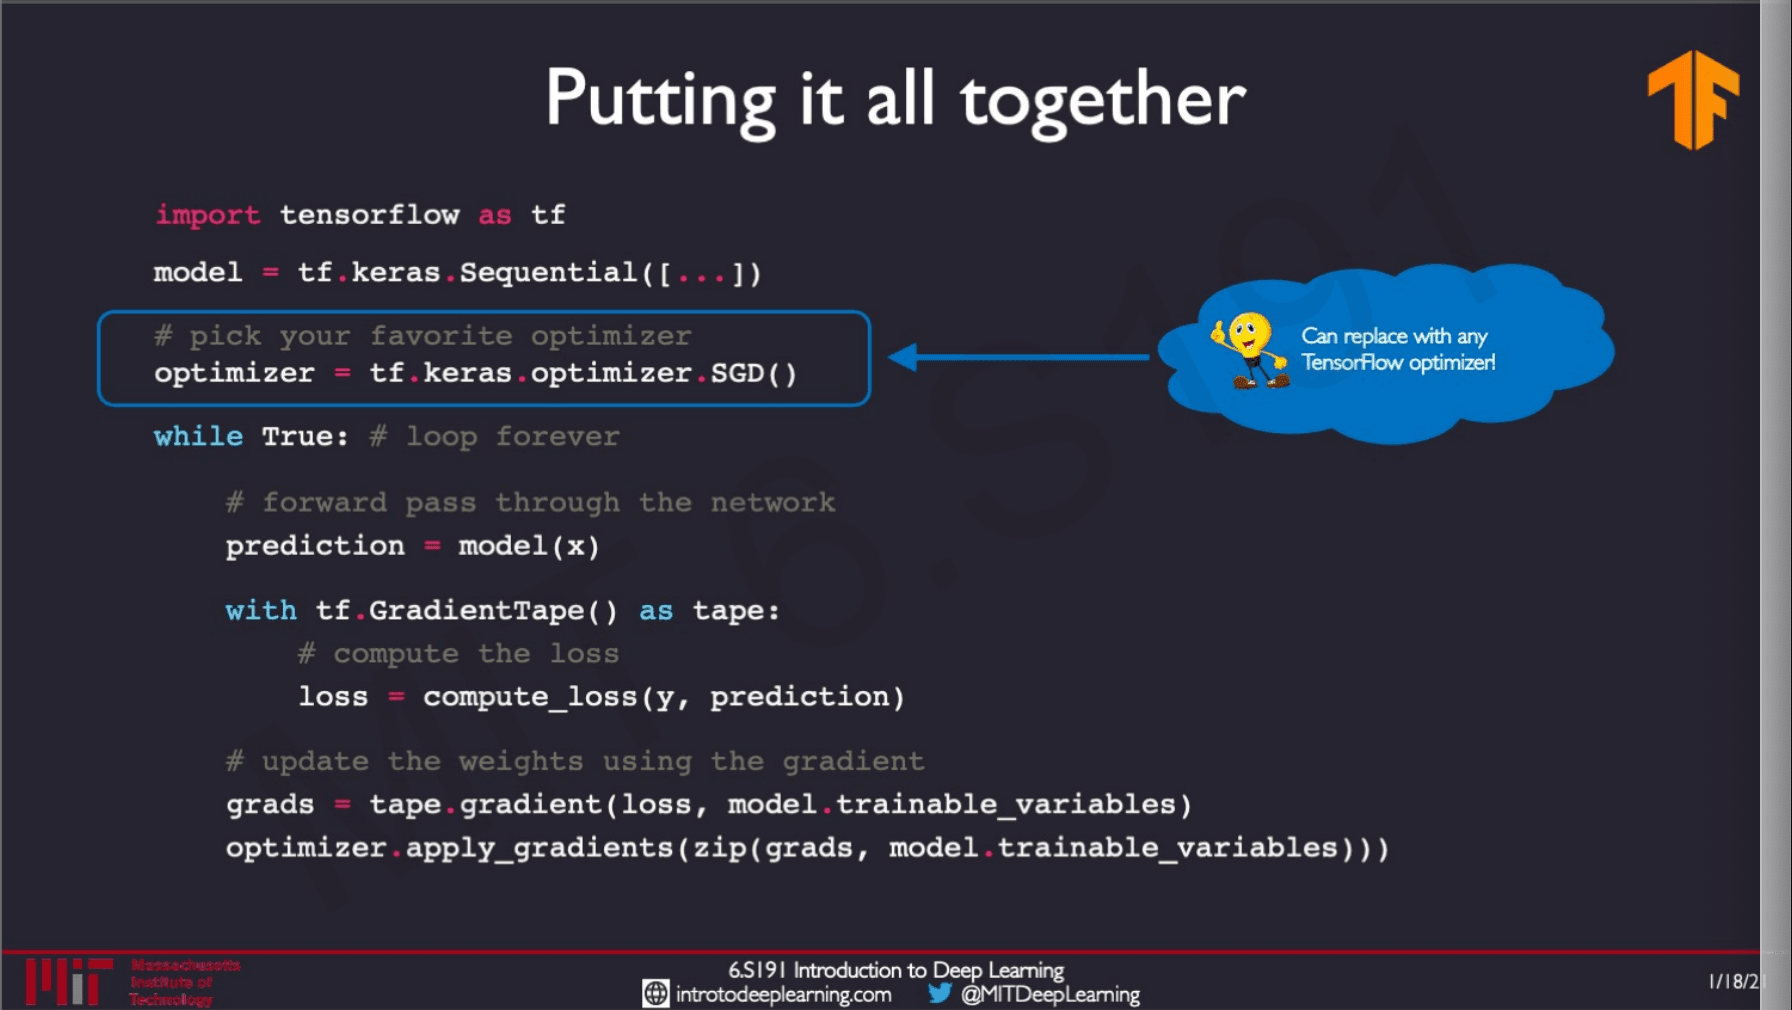
In tensor-flow this would be,
import tensorflow as tf
weights = tf.Variable([tf.random.normal()])

while True:
	with tf.GradientTape() as g:
		loss = compute_loss(weights)
		gradient = g.gradient(loss,weights)

	weights = weights - lr * gradient
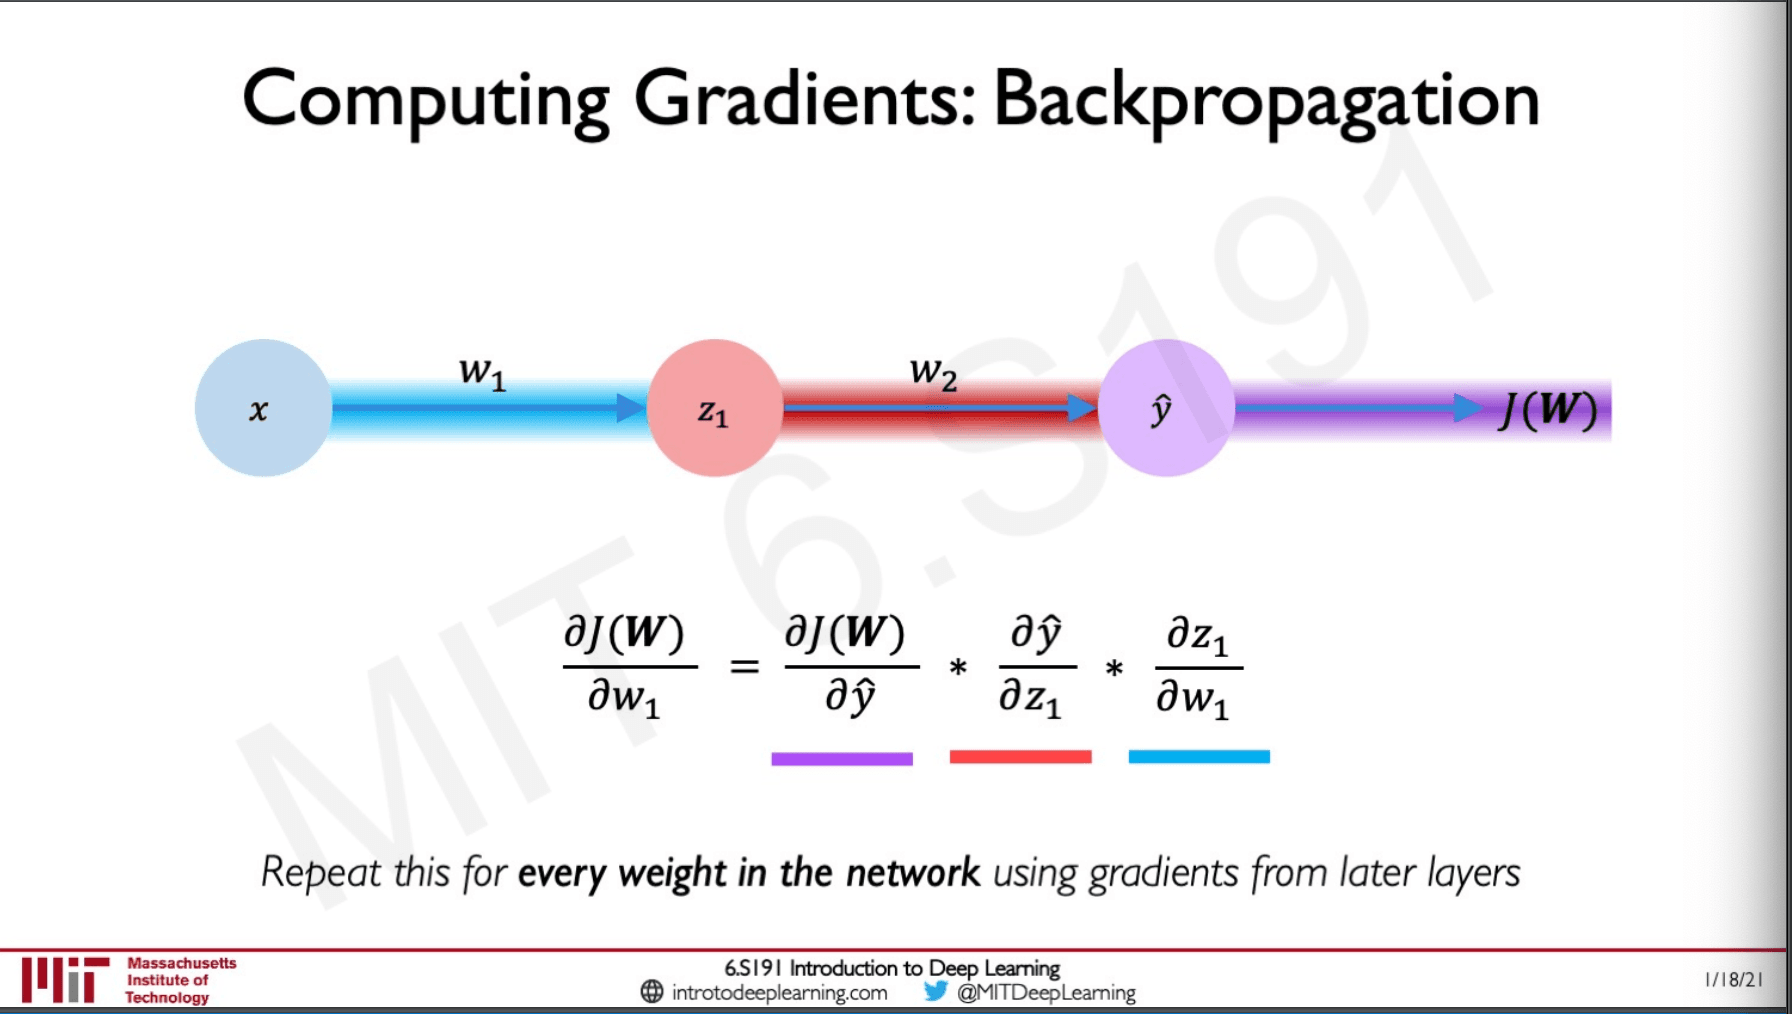
How we compute the gradient is really important in neural networks it is called backpropogation.
Back Propagation
The gradient tells us how a small change in our weight effect our loss.
How do we find the gradient? simply apply the chain rule recursively on each of the weights.
Neural Networks in practice
Training neural networks in real life is not as easy as it sounds like.
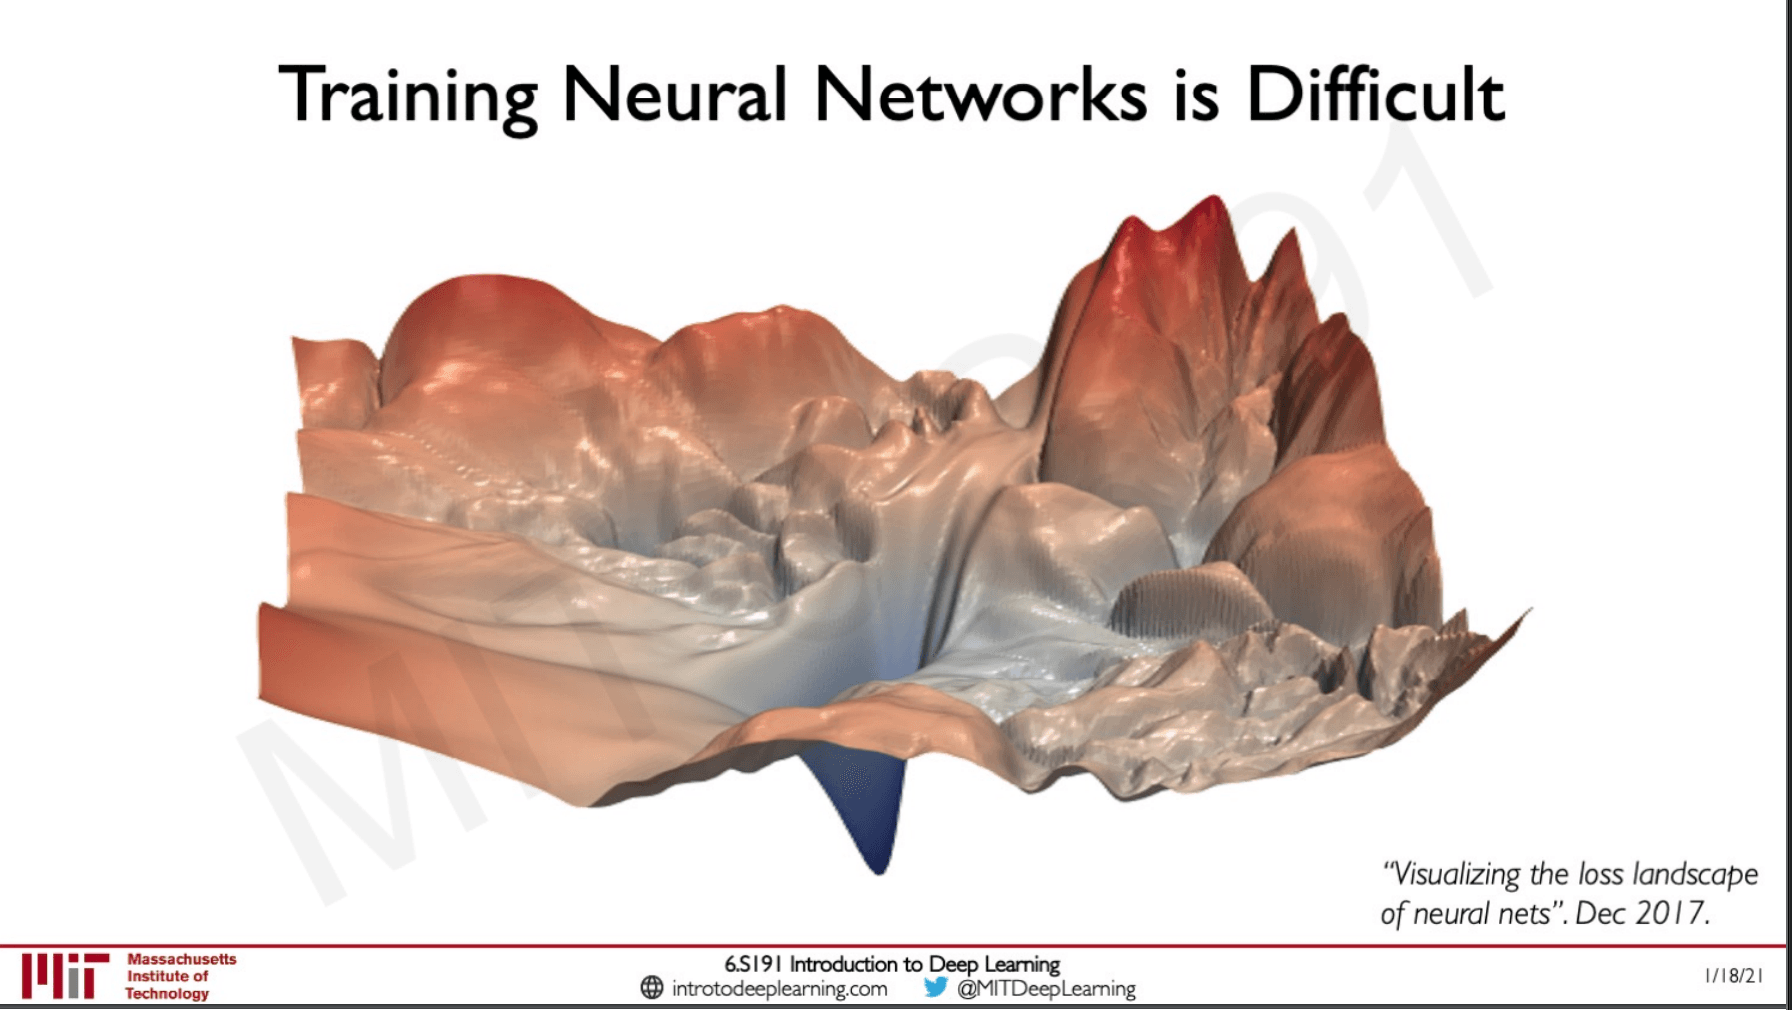
This is the loss landscape visualised as we can see here there are lot of places where if we start the training we the algorithm could get stuck.
Learning Rate
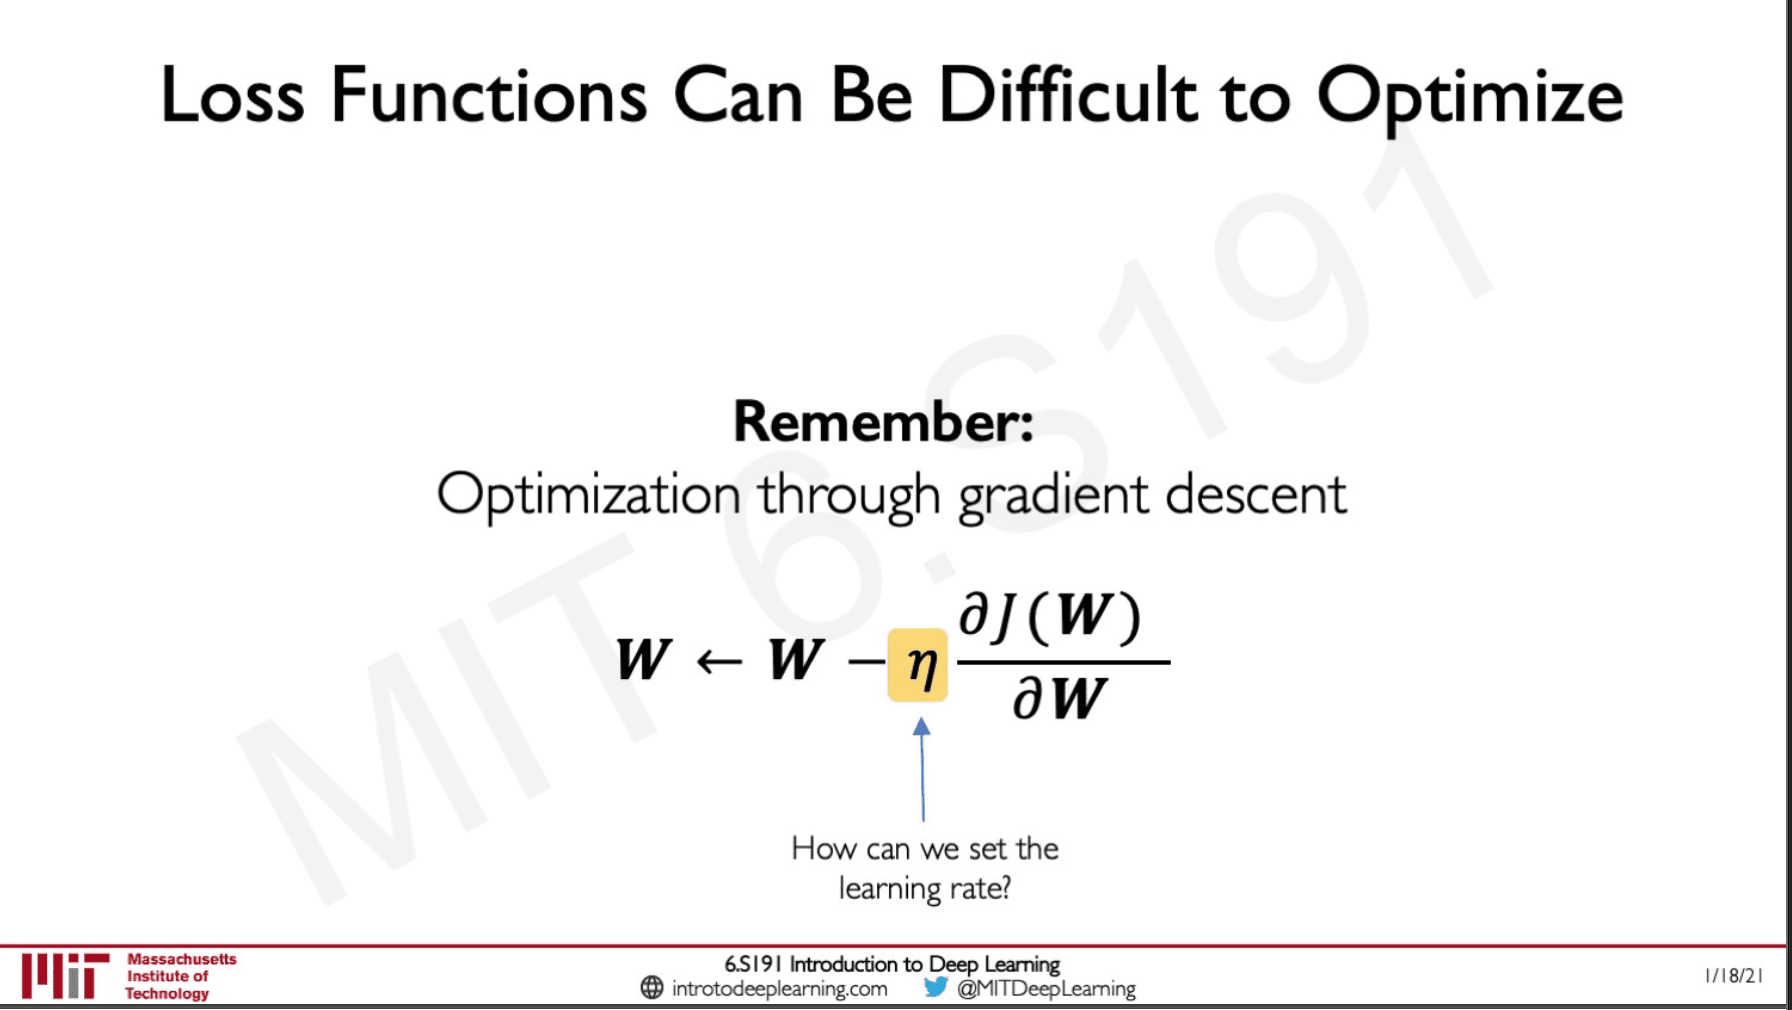
Here in the equation of gradient descent as well as in the code,
import tensorflow as tf
weights = tf.Variable([tf.random.normal()])

while True:
	with tf.GradientTape() as g:
		loss = compute_loss(weights)
		gradient = g.gradient(loss,weights)

	weights = weights - lr * gradient
We have something called as the lr, this is the learning rate which defines the magnitude for the weight update. The gradient gives us a sense of the direction and the learning rate gives us intuition on the magnitude.
Setting the learning rate
If we set the learning rate very low our algorithm will only start to learn very slowly which means that it is easy to get stuck in some minima.
If we set the learning rate too high the algorithm will overshoot the learning process and might overshoot from the local minima.
How to set learning rate?
- Try lots of different learning rates and see what works just right
- Build adaptive learning rate which looks at the loss landscape and adapts to the landscape.
Here the learning rates are not fixed we can adapt them depending on things like how large the gradient is, how fast can we learn and what is the size for particular weights.
Putting it all together
Mini-batches
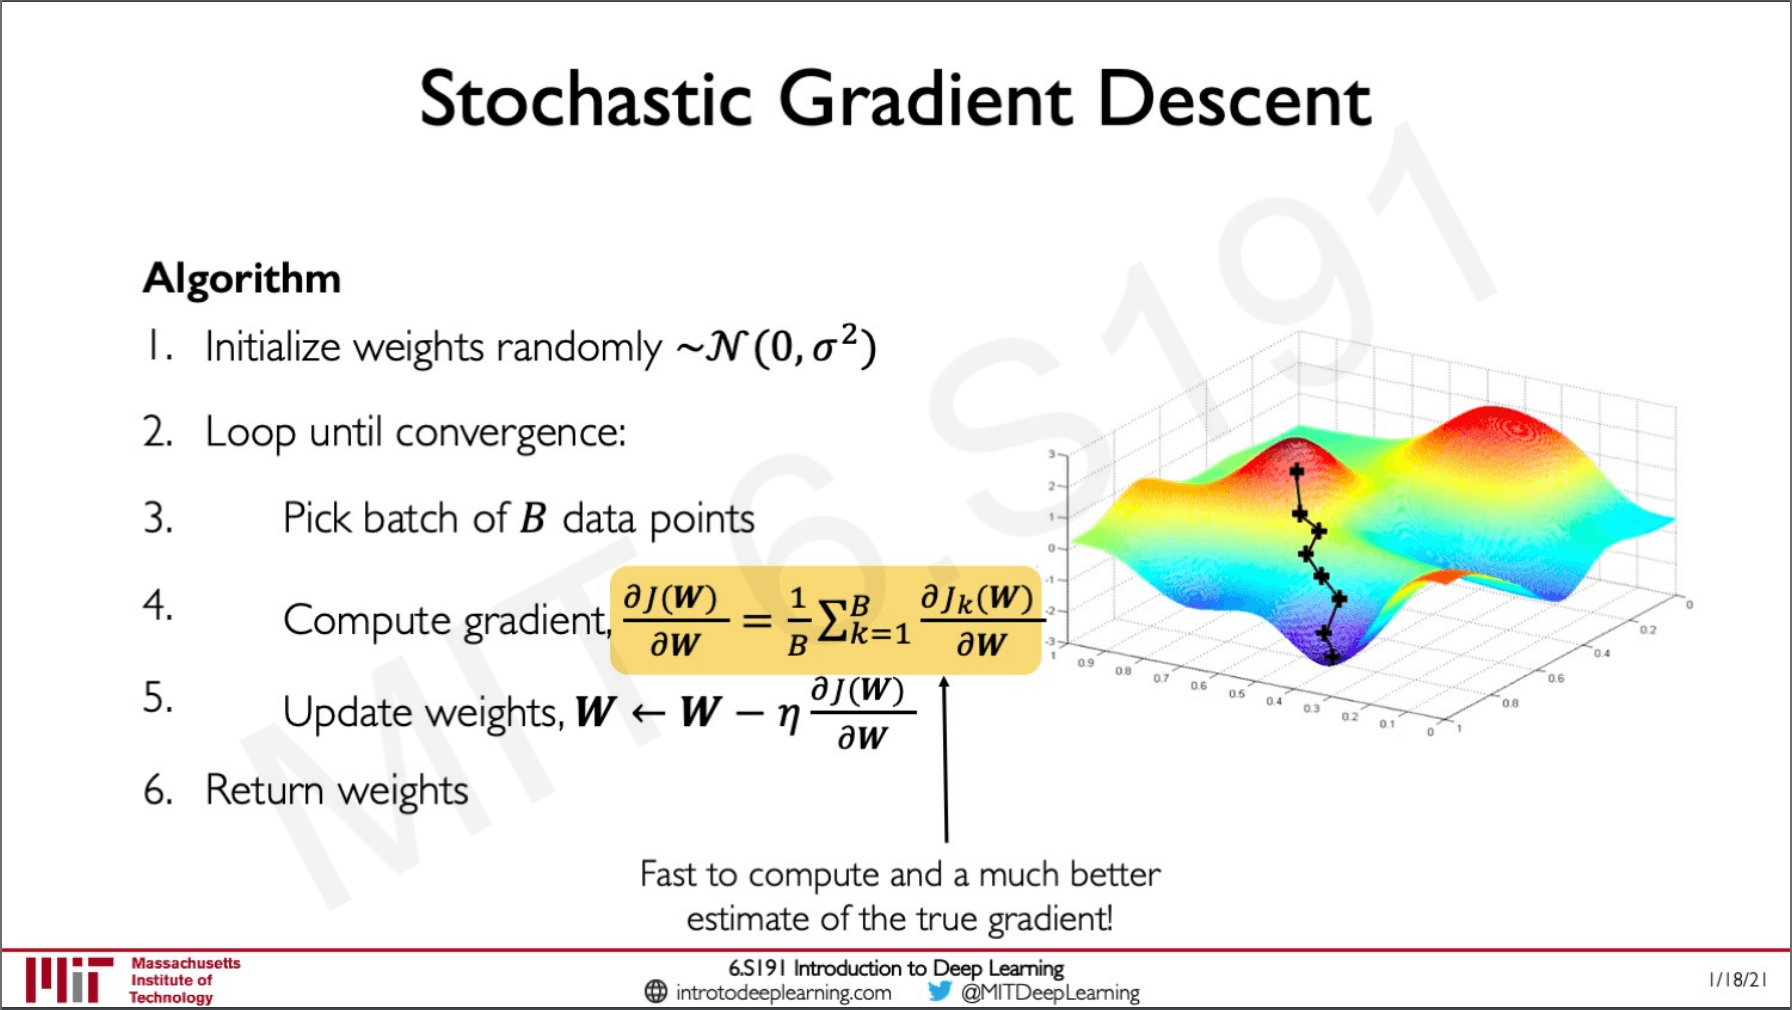
Instead of calculating gradient over a single point of the whole dataset we can select a batch of points B and then calculate the gradient for the same and use the average of that for the weight updates.
- This will be faster and would be less noisy than just taking one point.
- We have more accurate estimation with smoother convergence
- This also allows us to parallelize the execution thereby taking advantage of GPU's
Overfitting
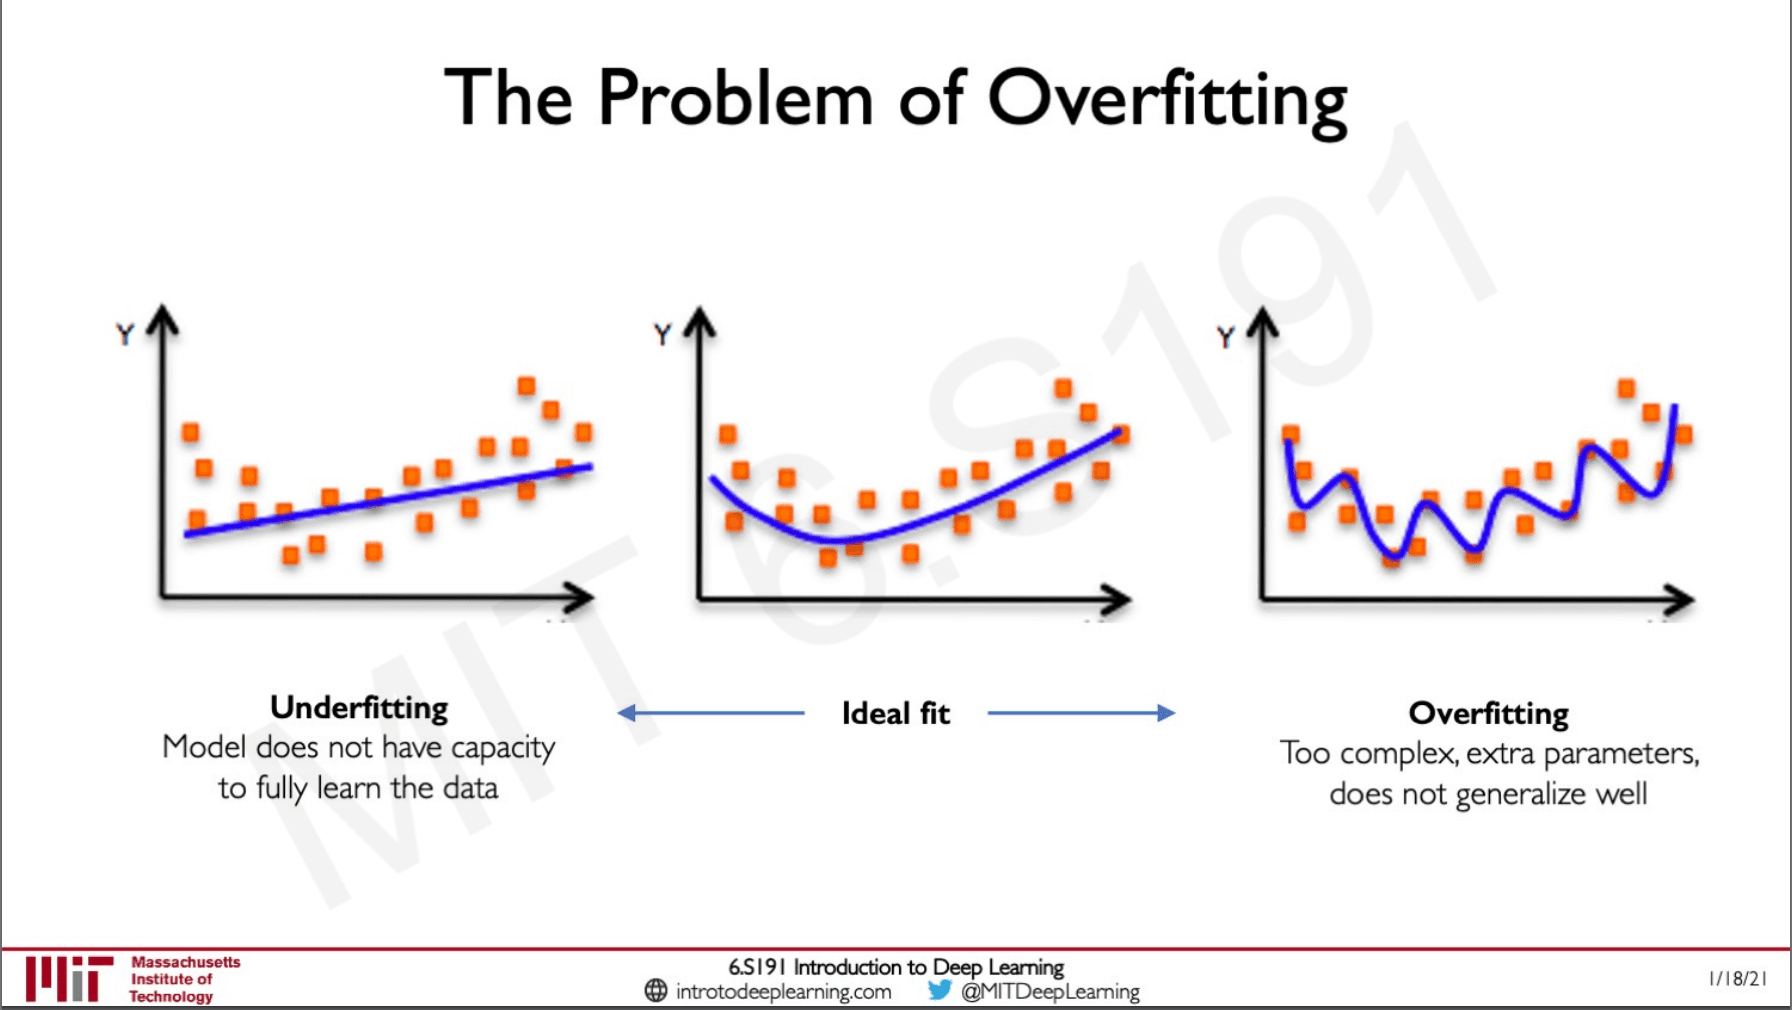
We always want our algorithm to perform well on test data. If our algorithm is only performing well on the training data this means that it is not learning anything it is only by byhearting the training data. On the far right, we can see the case of overfitting whereas on the far left we can see under-fitting where the is not generalising this might be because we are not using a powerful enough model or have not applied any sort of non-linearity.
Regualrization
This is a technique that constrains our optimisation problem to discourage complex models from overfitting on the data. This would help the model generalise well on complex unseen data.
Dropout
During training we randomly set some activations to 0 this would force the model to rely on only the node that are on. What this does is force the model to update the weights on these nodes so that on the next iteration some other nodes are on and the pervious once are off. So all the nodes are trained equally and prevents the model from overfitting by focusing on only a set of nodes all the time.
Early Stopping
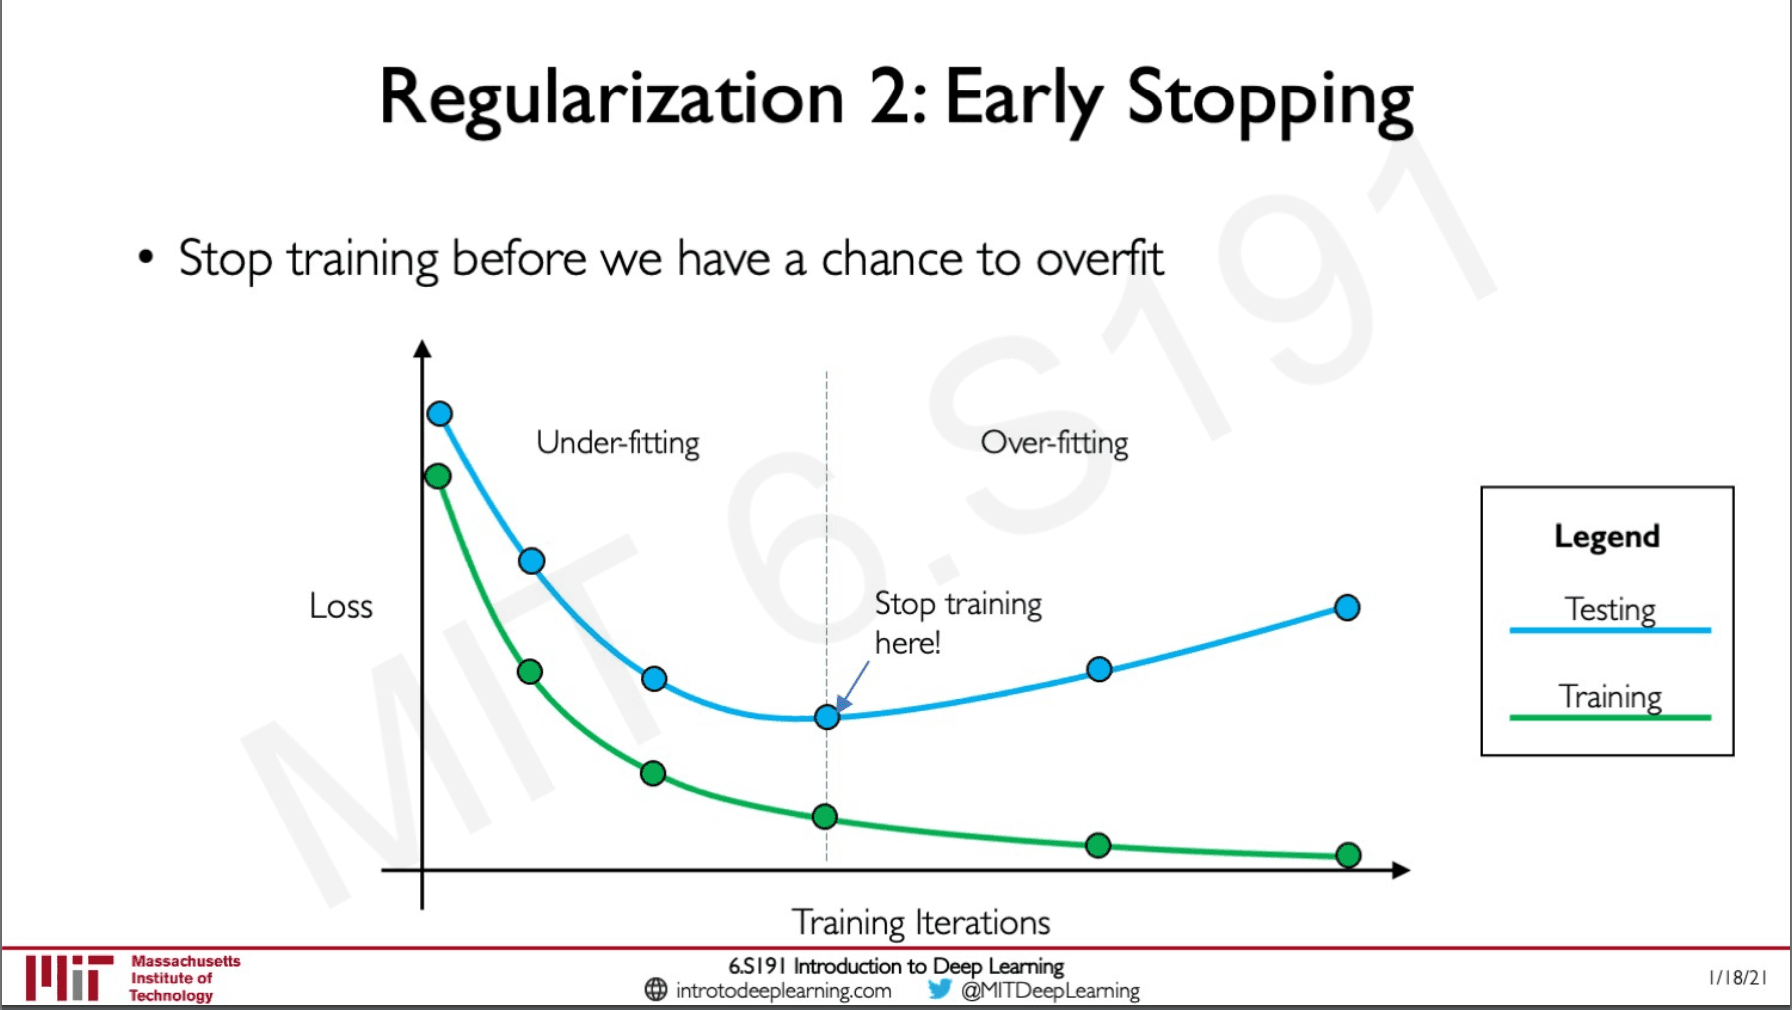
The idea here is to stop training when there is a chance of overfitting, we will be monitoring the testing and training losses and at a particular point the model will start performing bad on the testing set while showing improvement on the training set this is where we need to stop anything before this point wound be an under-fit and anything beyond this point would be over-fit.
Sources
MIT intro deep learning : http://introtodeeplearning.com/
Slides on intro to deep learning by MIT : http://introtodeeplearning.com/slides/6S191_MIT_DeepLearning_L1.pdf
Lab Solutions
https://github.com/abhijitramesh/learning-introtodeeplearning/blob/main/Part1_TensorFlow.ipynb
Subscribe to the newsletter
Get emails from me about machine learning, tech, statups and more.
- subscribers